Design. Create. Decorate.

Design. Create. Decorate.
Showing posts with label Sherwin Williams. Show all posts

Sunday, November 22, 2015

Buffalo Check Wall Treatment

Welcome to Quince Cottage!

Half baths are often tiny spaces, and ours is no exception. The upside is that a few changes can create a whole lot of style.
So, with our builder basic bathroom, here's what we did:

1. We substituted a mirror with a Victorian painted frame for the plain oval mirror.
© Rhiann Wynn-Nolet
© Rhiann Wynn-Nolet
2. As you might have noticed we also substituted an awesome light from Ballard Designs for the standard fixture.

Here's the original...

© Rhiann Wynn-Nolet
This is a better photo of the fixture we ordered (photo from the Ballard Designs website).

Photo from Ballard Design website (not in our house)

3. We substituted a sweet thrifted hook for the standard towel ring (screwed it to a painted wooden plaque first). Then we added a cute vintage soap holder (which we use for a scented candle).
Here's the original towel ring, pretty ho-hum, yes?

© Rhiann Wynn-Nolet

Here are the new towel hook and the soap dish.

© Rhiann Wynn-Nolet
© Rhiann Wynn-Nolet
Now for the most exciting part!

4. We did a wall treatment on one wall. It's such a small room that doing this on every wall would have made the space seem claustrophobic and overly busy.
Our inspiration was buffalo check fabric, which we love!

Here's the How To:

1. Figure out what colors you're going to use. Because this is a small room (yes, we know we keep harping on that), we went with a 3-color, rather than 4-color check. AND to simplify things and help the feature wall coordinate with the other three walls, we used the existing wall color for the mid-tone. That color is Sherwin Williams Agreeable Gray. The other two are Olympic Anew Gray and Olympic Milk Paint. On my monitor these have a cooler cast than they do in real life. For an authentic looking buffalo check, it's easiest to work with a single paint strip and choose three colors from it. Or choose a white or cream and then two colors from a single paint strip.

Sherwin Williams Agreeable Gray

Olympic Milk Paint
Olympic Anew Gray
2. Measure your wall. Figure out how big a scale you want the pattern to be and divide the wall vertically and horizontally accordingly. We wanted our squares to be "about" 12 inches. Our wall measured 83 inches wide, so we divided by seven, making seven squares that were about 11 7/8" wide. The wall was 100" high so we divided by eight, making the squares were about 12 1/2" high. Therefore, technically the squares weren't exactly square, but it's a small difference that isn't apparent to the naked eye, and it allowed us to have full squares over the whole wall. We ended up with a grid that was seven squares wide by eight squares high. You can choose to make the pattern fit the wall, as we did, or you can choose the size square you want and let the pattern end wherever it ends.

3. First we measured across, making marks every 11 7/8". Then we measured down and made marks every 12 1/2". Using a level and a ruler, draw faint lines with a pencil to connect the marks and create the squares.

© Rhiann Wynn-Nolet

© Rhiann Wynn-Nolet

4. To avoid mistakes, label the squares with pencil to indicate dark, medium, light. Starting in the upper left corner, we marked dark and went across that row making every other one dark. Skip a row, then repeat the dark row. Continue to the bottom. Then, the square that is in the middle of a set of four darks should be light. (Starting with the second row, the first square would be medium and the second would be light, continue with this sequence). Tape off the first set of squares to be painted. You can actually see some squares have already been painted in these photos - Ron was too quick, or Rhiann was too slow with the camera...

Tip: use good quality painters' tape and remove it as soon as you're done painting that color.

© Rhiann Wynn-Nolet

© Rhiann Wynn-Nolet

5. Here you can see that the dark squares have been done. Now it's time to do the lightest color.

© Rhiann Wynn-Nolet
6. Ta daaaa! Erase any remaining pencil marks.

© Rhiann Wynn-Nolet

© Rhiann Wynn-Nolet

Here are some more photos. Apologies for the grainy look-this room is...yes, TINY, and it was hard to light it and take photos in there without special equipment.

© Rhiann Wynn-Nolet
© Rhiann Wynn-Nolet
© Rhiann Wynn-Nolet
© Rhiann Wynn-Nolet

So, what do you think? Is this a treatment you'd try somewhere in your home?

Quince Cottage Style mixes old and new, rustic and opulent. 
Our goal is to make our new subdivision house look inviting, beautiful, 
and as though it wasn't born yesterday.

Daisy and Buster hope you'll come back and visit soon!

Daisy & Buster © Rhiann Wynn-Nolet


Friday, July 17, 2015

DIY Project - Fireplace Mantel

If this is your first time here, you may not realize that Quince Cottage is our brand spanking new home. Now there are LOTS of things to like about "new". We lived in a c. 1903 Craftsman Foursquare for ten years, and believe me, we know that old homes, charming as they are, can be, er, "cranky". We could tell you stories about exploding radiators, a leaking roof, and the floor-sanding disaster that led to a 911 call. Maybe some other time...
What old homes have, and new homes often lack, is character. Character shows up in a home's unique elements, those finely crafted, or even naively-crafted but nonetheless charming, details. There's the indisputable sense that the building has a longish history. How do you make a new subdivision house look as though it wasn't born yesterday? By "aging" it artificially, that's how.
Case in point: our fireplace mantel.
We were really pleased with the way our shiplap turned out. (If you missed that post, you can find it here). That really helped give our house the look of an old farmhouse. However, all that rustic loveliness made our crisp, snowy white fireplace surround look glaringly out of place.
A little while back we toured the Johnston County Parade of Homes and we saw a real, genuine old mantel installed in a new house. It looked fabulous! Here it is...

© Rhiann Wynn-Nolet
That piece of paper hanging there shows the old North Carolina plantation the mantel came from. Unfortunately, the house was being razed, but at least a part of it will live on and be treasured by a succeeding generations of home-owners.

It seemed silly-stupid to spend money and effort removing a perfectly good, traditionally shaped mantel, just to replace it with a beat up antique one.
So, given that Ron had just done a fabulous job with refinishing during the Barn Door Project , I "suggested" he employ those same skills on the mantel.

Here's what he did.

1. Tape anything around the fireplace you don't actually want to get "antiqued". Paint streaky marks and coat most edges of the mantel with brown acrylic paint (he used craft paint in a dark umber). Looks really ugly, right? Don't worry, everything will be okay.

© Rhiann Wynn-Nolet
Closeup © Rhiann Wynn-Nolet

2. Once the paint is dry, go over the brown paint with a candle, esp. the very edges (the candle is unlit, of course, it's the wax you want). Don't completely cover the brown paint, just some of it. Whatever the wax covers won't accept the next layer of paint.

© Rhiann Wynn-Nolet

3. Paint over everything with a creamy white paint. We used "Milk" Paint by Sherwin Williams.

© Rhiann Wynn-Nolet
4. Once the paint is dry, use a cloth and rub really hard over the areas painted brown. You may need to use your fingernail (covered by the cloth) to really get down to the brown for that "chipped" appearance).

Closeup © Rhiann Wynn-Nolet

5. Use a small brush to apply a thin coat of brown stain. Ron used Min-Wax Special Walnut. Make sure to get in creases and crevices for an enhanced aged effect. Quickly wipe off excess with a rag. Work in sections so that most of the brown paint comes right off.

© Rhiann Wynn-Nolet

6. Use paste wax to give everything a protective coating. Apply and buff with a soft rag.


© Rhiann Wynn-Nolet
Here's a closeup of the finished effect. Yup, all done with paint, brushes, a rag, a candle, stain, and paste wax. Ron's gotten really good at this, don't you think? He's already at work on a Top Secret Project! Don't worry, you'll get to see it eventually.

© Rhiann Wynn-Nolet
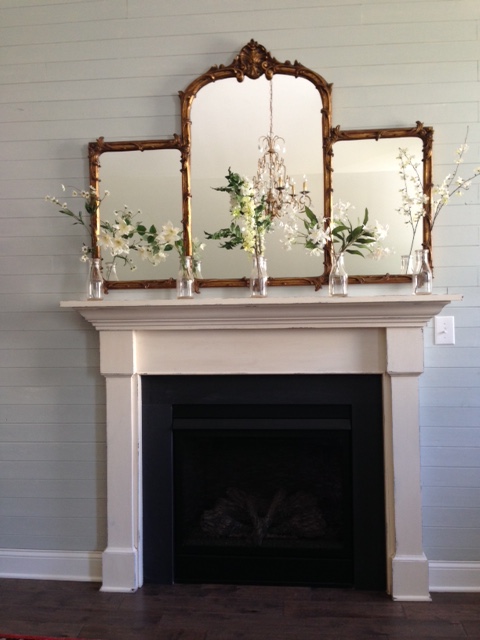
So, now all that's left is decorating. That's MY favorite part.

Ta-daaaa!!!

© Rhiann Wynn-Nolet
© Rhiann Wynn-Nolet

This mantel is a perfect example of  rustic + opulent = FABULOUS! Here at Quince Cottage, that's what we're all about.
Oh, and of course, no post would be complete without a picture of an adorable terrier. All that hard work on the fireplace was exhausting!

Buster © Rhiann Wynn-Nolet