Design. Create. Decorate.

Design. Create. Decorate.
Showing posts with label Irish Jack Russell Terrier. Show all posts

Friday, April 22, 2016

Recipe: Lemon 7Up Bundt Cake

Welcome to Quince Cottage!
As you may already know, we like to mix it up a little. While the majority of our posts are decor-related/DIYs, occasionally we share a favorite recipe. Which brings us to this cake, which Rhiann first enjoyed quite a few years ago at a work party. Credit goes to "Karen", and honestly we don't know where Karen got the recipe. At any rate, it's a keeper! The crust gets almost crunchy like a cookie, while the inside is moist and tender. Plus, the lovely lemon flavor. It's all good!
Now that it's feeling spring-like down here in the South, a lemony dessert seems like just the thing. So, wouldn't you know, the one ingredient Rhiann forgot to buy was the lemon extract! She only realized this after getting all the other ingredients out of the fridge and pantry. Good thing there's a grocery store about five minutes away. And on a positive note, that gave the soda time to come to room temperature, so all's well that ends well, right?

© Rhiann Wynn-Nolet
Ingredients:

8 oz. whipped butter
1/2 C Crisco shortening
8 oz. 7Up (room temperature)
5 eggs
1 tsp vanilla
1 tsp lemon extract
3 C flour
3 C sugar

Optional Glaze Ingredients:

1 stick butter
1 small package cream cheese
1 tsp vanilla
3/4 C confectioner's sugar
(Combine butter and cream cheese. Add vanilla and mix in. Add confectioner's sugar, 1/4 C at a time).

Directions:

1. Combine first 6 ingredients, in order (add eggs one at a time). We used a stand mixer with the whip attachment and if we'd had a splash guard, we would have used it. Don't worry if it seems like the soda and the butter/Crisco combo will never become "one". Once you add the eggs, things start to improve (but still look pretty funky).
2. Mix sugar and flour together and then add to wet mixture in batches. Once the batter is smooth, it's ready to pour in the pan.
3. Grease a bundt pan. We used cooking spray and it didn't work 100%, so greasing might be better.
4. Cook at 300 degrees F for one hour (put cake in when the oven is cold). Raise oven temperature to 350 degrees F and cook 15 more minutes.
5. Allow to cool 15 minutes and then remove from pan.
6. Allow to cool thoroughly before glazing if you do the glaze. We sprinkled confectioner's sugar instead, which did a fairly decent job of camouflaging the spots where the cake didn't unmold perfectly.

Here's what the cake looked like when first removed from the oven.
© Rhiann Wynn-Nolet
Here are a few more pix...
© Rhiann Wynn-Nolet
© Rhiann Wynn-Nolet
Would you like a slice?
© Rhiann Wynn-Nolet
We enjoyed just as much the next night! By the way, that stiped table treatment was an earlier DIY, if you want a closer look, see it here.

© Rhiann Wynn-Nolet
Isn't that rose pretty? Our rose bushes just started blooming a week or so ago.

© Rhiann Wynn-Nolet
Now it's time for a cute terrier pic!

Buster © Rhiann Wynn-Nolet
Don't forget about #MagpieMonday on IG. Follow us here to learn more.

© Rhiann Wynn-Nolet

© Rhiann Wynn-Nolet


Quince Cottage Style is #agrarianchic - a mix of old and new, rustic and opulent.
Our goal is to make our new subdivision house look inviting, beautiful, 
and as though it wasn't born yesterday!

Sunday, April 17, 2016

DIY - Upcycled Fountain

Welcome to Quince Cottage!
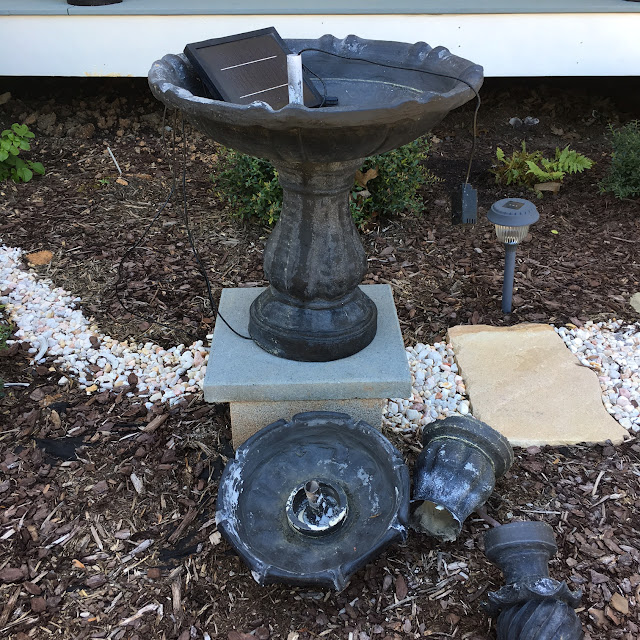
When you spend a couple of hundred dollars on a solar-powered fountain, you kind of expect it to last more than two years. Well, at least we did. When ours stopped working at the end of last summer it was hard to determine why. Was it the pump? Was it the solar panel? Was it the wiring?

Last summer in the garden © Rhiann Wynn-Nolet
We used our dead fountain for Halloween. It seemed appropriate...

Macabre © Rhiann Wynn-Nolet
It sat in our courtyard garden all winter, basically waiting for the upcoming neighborhood big clean up, when we planned to heave it into the dumpster. And then we had a bit of storm, and it blew over and pieces of it broke, so at that point we no longer had any guilt at all about tossing it.

Toast © Rhiann Wynn-Nolet

But then Rhiann had an idea. Why not take the remaining intact pieces and use it for a container garden?
The steps were so easy it didn't even need documenting. Basically she filled the bottom with a layer of gravel, to add both weight and drainage. Next she added potting soil. Then came the plants and more soil, topped with a layer of mulch to retain moisture and keep the dirt from blowing out.
Ta-daaa! Done!

Close up © Rhiann Wynn-Nolet
Fountain garden © Rhiann Wynn-Nolet
All's well that ends well © Rhiann Wynn-Nolet
Let's pretend you don't see that folded up pile of old sheets in the chair (we had a frost a week or so ago and used them to cover up our roses).
There's still the top bowl of the fountain that we might do something with too - like a succulent garden. How trendy would that be?

Here's that cute Jack Russell Terrier pic you were waiting for!

Daisy & Buster © Rhiann Wynn-Nolet
Don't forget to follow us on Instagram here and join us for #MagpieMonday !

© Rhiann Wynn-Nolet
See you around!

Quince Cottage Style is #agrarianchic - a mix of old and new, rustic and opulent.
Our goal is to make our new subdivision house look inviting, beautiful, 
and as though it wasn't born yesterday!

Thursday, February 11, 2016

DIY Old Clock Shadowbox

Welcome to Quince Cottage!
Today we have a small-scale DIY project to share.
Rhiann blames Pinterest for this one. All those pretty pictures of fascinating, artsy shadowboxes made from Altoid's tins made her want to make one for herself, but in a somewhat larger size.
We found an old clock at a thrift shop. It wasn't working, so no need for remorse about disemboweling it. Besides, we plan to upcycle all the parts into various other projects.

© Rhiann Wynn-Nolet
Once the innards were out, it was time to scrape off what remained of the decal ornamentation on the glass front.
© Rhiann Wynn-Nolet
She painted the inside a light blue to blend in with the sky image she found on the interwebs. After copy/pasting it into a Word doc, she printed it out, cut it to fit and glued it in. She used a different image, this time of mountains and hills, and repeated the process for the lower section.
We found a ceramic bird magnet at a little shop. A blob of hot glue and it's forever flying high!
A real twig, broken to size, simulates tree branches. A dollop of hot glue holds the stick in place. There's no need to over-worry the matter of scale. In other words, the ingredients all make sense, and that's sufficient in this kind of piece. Some moss from the hobby shop lines the bottom of the clock. (again hot glue here and there).
Finally the crowning glory--a real bird's nest that Rhiann found blown out of the trees after a storm. Look at that pretty blue thread running through it! That bird had a decorator's eye for sure.

Nest © Rhiann Wynn-Nolet
This is what it looks like close up, with the door open.

© Rhiann Wynn-Nolet
Here's the finished creation.

Shadowbox © Rhiann Wynn-Nolet

This was a fun project that didn't take very much time at all. Maybe we'll do another shadowbox soon!
If you're on Instagram follow us here and show your decor collections for #MagpieMonday!

© Rhiann Wynn-Nolet
This week feels like winter here in North Carolina, but last week was warm enough to spend a little time relaxing on our back porch. Here's Daisy basking in the sun. What's the weather like where you are? Tell us in comments, we love to hear from our followers!

Daisy © Rhiann Wynn-Nolet


Quince Cottage Style mixes old and new, rustic and opulent.
Our goal is to make our new subdivision house look inviting, beautiful, 
and as though it wasn't born yesterday!


Monday, December 21, 2015

Setting the Holiday Table

Welcome to Quince Cottage!
It's getting pretty close to Christmas, and we've figured out the menu. How about you? Once the food questions were decided, we turned our attention to setting the table.
We like things to be easy whenever possible and yet, we get bored when things always look the same. Here's a little tutorial meant to inspire you. We didn't spend hours layering china patterns, creating elaborate centerpieces, or hand-writing place cards. These looks are simple and practical, but offer variety, with very little effort. Also, none of the china, glassware, or napkins are specifically Christmas. We don't know about you, but our storage space is limited, and we like our tableware to work for more than one occasion.
Start with your basic centerpiece concept, whatever that might be. This year we decided to include some of our favorite things: milk glass, pine cones, mercury glass and pompoms! In all the tablescapes below there's a faux fur runner and three compotes filled with either the pine cones or the pompoms.

Look #1. we went with a natural and neutral theme, using taupe gingham place mats, beige/white damask napkins and white china plates and milk glass tumblers.

© Rhiann Wynn-Nolet

Look #2. Here we incorporated cheery red with a tablecloth, napkins, and Bohemian crystal glassware. The plates stayed the same.

© Rhiann Wynn-Nolet
Here's a closer look at some of those snowmen. Aren't they cute?

© Rhiann Wynn-Nolet
Look #3 is basically the same but we fancied up the napkins a tiny bit by tying a glass pine cone ornament on with twine.

© Rhiann Wynn-Nolet
Look #4. Here we used brown transferware plates and a colorful plaid napkin. That's a lot of pattern, so we simplified the glassware to clear crystal tumblers.

© Rhiann Wynn-Nolet

Look #5. By the way, it's perfectly okay to mix plaids, stripes, ginghams and other prints. Just be sure there's something uniting them - in this case, the color red. White plates again, a pine cone "garnish" and the crystal juice glasses. This would be a fun breakfast setting, wouldn't it?

© Rhiann Wynn-Nolet
Look #6. Back to the red glassware, and a napkin ring with Russian khokhloma painting.

© Rhiann Wynn-Nolet
Look #7 This one is quite playful, isn't it? Normally we use our jadeite in the summer, but we thought it looked cool with this plaid napkin, a vintage Shiny Bright ornament, and a mason jar mug.

© Rhiann Wynn-Nolet
All these place settings were the work of about three minutes each, and the combinations are practically endless. Stealing decorative items from other vignettes or Mother Nature is highly recommended. We used to have a book on artsy napkin-folding and if you have the time and interest, by all means impress your guests with your skills.
Which look is your favorite? 
Daisy provided moral support, or maybe she was just hoping a meal was about to be served in the dining room.

© Rhiann Wynn-Nolet
Quince Cottage Style mixes old and new, rustic and opulent.
Our goal is to make our new subdivision house look inviting, beautiful, 
and as though it wasn't born yesterday!
Sunday, November 22, 2015

Buffalo Check Wall Treatment

Welcome to Quince Cottage!

Half baths are often tiny spaces, and ours is no exception. The upside is that a few changes can create a whole lot of style.
So, with our builder basic bathroom, here's what we did:

1. We substituted a mirror with a Victorian painted frame for the plain oval mirror.
© Rhiann Wynn-Nolet
© Rhiann Wynn-Nolet
2. As you might have noticed we also substituted an awesome light from Ballard Designs for the standard fixture.

Here's the original...

© Rhiann Wynn-Nolet
This is a better photo of the fixture we ordered (photo from the Ballard Designs website).

Photo from Ballard Design website (not in our house)

3. We substituted a sweet thrifted hook for the standard towel ring (screwed it to a painted wooden plaque first). Then we added a cute vintage soap holder (which we use for a scented candle).
Here's the original towel ring, pretty ho-hum, yes?

© Rhiann Wynn-Nolet

Here are the new towel hook and the soap dish.

© Rhiann Wynn-Nolet
© Rhiann Wynn-Nolet
Now for the most exciting part!

4. We did a wall treatment on one wall. It's such a small room that doing this on every wall would have made the space seem claustrophobic and overly busy.
Our inspiration was buffalo check fabric, which we love!

Here's the How To:

1. Figure out what colors you're going to use. Because this is a small room (yes, we know we keep harping on that), we went with a 3-color, rather than 4-color check. AND to simplify things and help the feature wall coordinate with the other three walls, we used the existing wall color for the mid-tone. That color is Sherwin Williams Agreeable Gray. The other two are Olympic Anew Gray and Olympic Milk Paint. On my monitor these have a cooler cast than they do in real life. For an authentic looking buffalo check, it's easiest to work with a single paint strip and choose three colors from it. Or choose a white or cream and then two colors from a single paint strip.

Sherwin Williams Agreeable Gray

Olympic Milk Paint
Olympic Anew Gray
2. Measure your wall. Figure out how big a scale you want the pattern to be and divide the wall vertically and horizontally accordingly. We wanted our squares to be "about" 12 inches. Our wall measured 83 inches wide, so we divided by seven, making seven squares that were about 11 7/8" wide. The wall was 100" high so we divided by eight, making the squares were about 12 1/2" high. Therefore, technically the squares weren't exactly square, but it's a small difference that isn't apparent to the naked eye, and it allowed us to have full squares over the whole wall. We ended up with a grid that was seven squares wide by eight squares high. You can choose to make the pattern fit the wall, as we did, or you can choose the size square you want and let the pattern end wherever it ends.

3. First we measured across, making marks every 11 7/8". Then we measured down and made marks every 12 1/2". Using a level and a ruler, draw faint lines with a pencil to connect the marks and create the squares.

© Rhiann Wynn-Nolet

© Rhiann Wynn-Nolet

4. To avoid mistakes, label the squares with pencil to indicate dark, medium, light. Starting in the upper left corner, we marked dark and went across that row making every other one dark. Skip a row, then repeat the dark row. Continue to the bottom. Then, the square that is in the middle of a set of four darks should be light. (Starting with the second row, the first square would be medium and the second would be light, continue with this sequence). Tape off the first set of squares to be painted. You can actually see some squares have already been painted in these photos - Ron was too quick, or Rhiann was too slow with the camera...

Tip: use good quality painters' tape and remove it as soon as you're done painting that color.

© Rhiann Wynn-Nolet

© Rhiann Wynn-Nolet

5. Here you can see that the dark squares have been done. Now it's time to do the lightest color.

© Rhiann Wynn-Nolet
6. Ta daaaa! Erase any remaining pencil marks.

© Rhiann Wynn-Nolet

© Rhiann Wynn-Nolet

Here are some more photos. Apologies for the grainy look-this room is...yes, TINY, and it was hard to light it and take photos in there without special equipment.

© Rhiann Wynn-Nolet
© Rhiann Wynn-Nolet
© Rhiann Wynn-Nolet
© Rhiann Wynn-Nolet

So, what do you think? Is this a treatment you'd try somewhere in your home?

Quince Cottage Style mixes old and new, rustic and opulent. 
Our goal is to make our new subdivision house look inviting, beautiful, 
and as though it wasn't born yesterday.

Daisy and Buster hope you'll come back and visit soon!

Daisy & Buster © Rhiann Wynn-Nolet