Design. Create. Decorate.

Design. Create. Decorate.
Showing posts with label antiquing. Show all posts

Friday, September 25, 2015

Something About This Old Dresser - DIY

Hey there, welcome back to Quince Cottage! We hope you're enjoying the autumn weather, wherever you may be.
Do you love to go thrifting/antiquing/junkin'? We do! If we have a specific item in mind, it's like a treasure hunt, but sometimes we go just to see what's out there, and find treasure accidentally.
Recently we were looking for a dresser for our master bedroom. The one we had was smallish, and not well-made. Ron hated it. I was kind of meh about it. Anyway, we checked our local thrift/antique stores, scoured Craigslist and local online yard sales, and a few came close. Unfortunately they were either too beat up, too big, too small, or too expensive.
Then one day we checked out a place in Raleigh that changed hands not too long ago, and a dresser caught our eye. The curvy profile, along with the wood's beautiful color and graining made us take a closer look. The drawers actually slid quite well. It wasn't missing a leg. And the price? It was pretty reasonable.

Dresser in shop © Rhiann Wynn-Nolet
Not wanting to make a hasty decision, we continued through the rest of the shop. And then we saw another piece.

We both had this kind of reaction...

cartoon disney gif


By the way, our dog Buster is a LOT like Doug in terms of personality.

Buster © Rhiann Wynn-Nolet
But I digress...

We hemmed and hawed. What should we do? Buy just one piece? If so, which one? We'd really been looking for a dresser, but maybe an armoire could take its place, if we added shelves...

Or maybe the owner would give us a great deal if we took both? We asked. He said he would. We weren't sure where the armoire would even fit anywhere in our home. Measurements were taken. We went back the next day and bought them both!
Here they are in our garage. That's the back of the armoire. Definitely a home-made piece, which is a good part of its charm.

© Rhiann Wynn-Nolet

However, this is the dresser's story (the armoire will get its turn later on down the road). Yes, I did say the color and grain of certain parts of the dresser were gorgeous. Other parts, not so much.

© Rhiann Wynn-Nolet
© Rhiann Wynn-Nolet
The wood on the drawer fronts and top was lovely, but dried out and dirty.
© Rhiann Wynn-Nolet
The finish wasn't original on the other parts (kind of orange-y and shellacked). What to do? If you're offended by the painting of furniture, you'd best leave now...

We'd seen another dresser in a different shop that had been partially painted and it looked fabulous (the price tag, not so much). We decided to hack the look. Ron thoroughly cleaned the whole piece, and put a coat of clear acrylic polyurethane on the drawers' interiors. He also replaced a missing drawer stop with a piece of paint stirrer, and waxed the drawer runners with a candle to make them slide even more smoothly. He took the mirror off and removed its supports. Next he taped off the parts of the dresser he didn't want to paint (the lovely grainy parts).

© Rhiann Wynn-Nolet

Then he applied a coat of green latex paint.

 Note replaced drawer stop © Rhiann Wynn-Nolet
© Rhiann Wynn-Nolet

Once it was dry, he sanded it off in areas that would naturally become worn (and this is a really key step in creating an authentically distressed look).

© Rhiann Wynn-Nolet

Then he wiped dark stain along those sanded areas.

© Rhiann Wynn-Nolet

Finally, after the stain dried, he applied paste wax to the entire piece. Waxing really brings out the warmth and beauty of wood grain and helps prevent it from drying out.

Drawers before paste wax © Rhiann Wynn-Nolet
Drawers after paste wax © Rhiann Wynn-Nolet
Next we put the mirror back in place, lined the drawers with paper, and moved the dresser to its destination, where we styled it for fall!

© Rhiann Wynn-Nolet
Here it is a little more lit up.

© Rhiann Wynn-Nolet

Thank you for visiting, we hope you come back soon!

Quince Cottage Style mixes old and new, rustic and opulent. Our goal is to make our

 new subdivision house look inviting and beautiful,

and as though it wasn't born yesterday. 


Friday, July 17, 2015

DIY Project - Fireplace Mantel

If this is your first time here, you may not realize that Quince Cottage is our brand spanking new home. Now there are LOTS of things to like about "new". We lived in a c. 1903 Craftsman Foursquare for ten years, and believe me, we know that old homes, charming as they are, can be, er, "cranky". We could tell you stories about exploding radiators, a leaking roof, and the floor-sanding disaster that led to a 911 call. Maybe some other time...
What old homes have, and new homes often lack, is character. Character shows up in a home's unique elements, those finely crafted, or even naively-crafted but nonetheless charming, details. There's the indisputable sense that the building has a longish history. How do you make a new subdivision house look as though it wasn't born yesterday? By "aging" it artificially, that's how.
Case in point: our fireplace mantel.
We were really pleased with the way our shiplap turned out. (If you missed that post, you can find it here). That really helped give our house the look of an old farmhouse. However, all that rustic loveliness made our crisp, snowy white fireplace surround look glaringly out of place.
A little while back we toured the Johnston County Parade of Homes and we saw a real, genuine old mantel installed in a new house. It looked fabulous! Here it is...

© Rhiann Wynn-Nolet
That piece of paper hanging there shows the old North Carolina plantation the mantel came from. Unfortunately, the house was being razed, but at least a part of it will live on and be treasured by a succeeding generations of home-owners.

It seemed silly-stupid to spend money and effort removing a perfectly good, traditionally shaped mantel, just to replace it with a beat up antique one.
So, given that Ron had just done a fabulous job with refinishing during the Barn Door Project , I "suggested" he employ those same skills on the mantel.

Here's what he did.

1. Tape anything around the fireplace you don't actually want to get "antiqued". Paint streaky marks and coat most edges of the mantel with brown acrylic paint (he used craft paint in a dark umber). Looks really ugly, right? Don't worry, everything will be okay.

© Rhiann Wynn-Nolet
Closeup © Rhiann Wynn-Nolet

2. Once the paint is dry, go over the brown paint with a candle, esp. the very edges (the candle is unlit, of course, it's the wax you want). Don't completely cover the brown paint, just some of it. Whatever the wax covers won't accept the next layer of paint.

© Rhiann Wynn-Nolet

3. Paint over everything with a creamy white paint. We used "Milk" Paint by Sherwin Williams.

© Rhiann Wynn-Nolet
4. Once the paint is dry, use a cloth and rub really hard over the areas painted brown. You may need to use your fingernail (covered by the cloth) to really get down to the brown for that "chipped" appearance).

Closeup © Rhiann Wynn-Nolet

5. Use a small brush to apply a thin coat of brown stain. Ron used Min-Wax Special Walnut. Make sure to get in creases and crevices for an enhanced aged effect. Quickly wipe off excess with a rag. Work in sections so that most of the brown paint comes right off.

© Rhiann Wynn-Nolet

6. Use paste wax to give everything a protective coating. Apply and buff with a soft rag.


© Rhiann Wynn-Nolet
Here's a closeup of the finished effect. Yup, all done with paint, brushes, a rag, a candle, stain, and paste wax. Ron's gotten really good at this, don't you think? He's already at work on a Top Secret Project! Don't worry, you'll get to see it eventually.

© Rhiann Wynn-Nolet
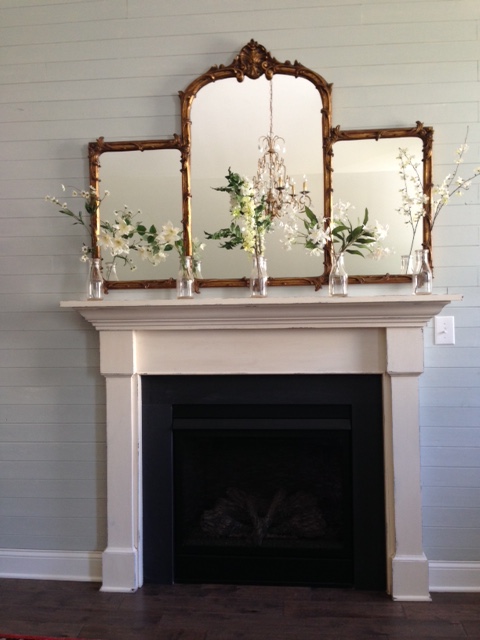
So, now all that's left is decorating. That's MY favorite part.

Ta-daaaa!!!

© Rhiann Wynn-Nolet
© Rhiann Wynn-Nolet

This mantel is a perfect example of  rustic + opulent = FABULOUS! Here at Quince Cottage, that's what we're all about.
Oh, and of course, no post would be complete without a picture of an adorable terrier. All that hard work on the fireplace was exhausting!

Buster © Rhiann Wynn-Nolet