Design. Create. Decorate.

Design. Create. Decorate.
Showing posts with label #MagpieMonday. Show all posts

Sunday, May 29, 2016

Spring to Summer - 6 Tips for Vignette Styling

Welcome to Quince Cottage!
When it comes to seasonal decor, which part of your home do you most enjoy styling? For Rhiann, it's the mantel.
Follow along as she creates vignettes for spring and summer. Oh, and by the way, some of the items pictured here are available in our brand new Etsy shop! Click here.

Tip 1: the "Power Of Three" is often employed when creating a new vignette. Vignettes work best using an odd number of elements. In other words, five is okay, four, not so much.

Tip 2-5: Mix heights, round shapes and angled shapes, organic with man-made, and if possible, throw in something that is a bit of a surprise!

If you weren't here a few months ago, here's where we were in late winter, sort of a combo of snow and green...

© Rhiann Wynn-Nolet

Tip 6: Old books are perfect for adding height, play around to decide exactly what looks best. You can have the leather or cloth spines showing, or the page side, or wrap the books in white or craft paper, all depending on what look you want.

In this vignette on our dining room sideboard, the three primary vignette elements are the wire cage, the plant, and the shell. Broken down further, the two brass quail and the tiny plant form a mini-vignette with the books (showing their leather spines) acting as a base. On a macro level, the windmill head, the mirror and the cage/shell/plant grouping also create a Power Of Three composition. By the way, that mirror? A $7 score at Willie's (aka Goodwill)!
And this is why I'm linking up to Dagmar's Home Blog because she kindly featured us on her IG account for this particular pic! Thank you, Dagmar! If you're a blogger, please consider joining the link party, it's a great way of making new friends.

Dagmar's Home Thrifty and Vintage Finds link party

© Rhiann Wynn-Nolet
Here you see a vignette that straddles the counter between our kitchen and dining. It's got the "unexpected" in the form of a vintage toy tractor (Ron collects those). The organic element is covered by the flowers and cotton. Don't you just love cotton?

© Rhiann Wynn-Nolet
Here's another one, this time from our gallery wall. Three. Round and not round. Organic elements.

© Rhiann Wynn-Nolet
But now back to the mantel. In April, the mood switched to romantic. The left side featured a shadow box Rhiann made from an old clock, if you're interested in learning more about that, click here. Technically there are four elements in this grouping, but the books and clock read as one. Note that the page sides are showing, to create a softer, lighter look.

©Rhiann Wynn-Nolet
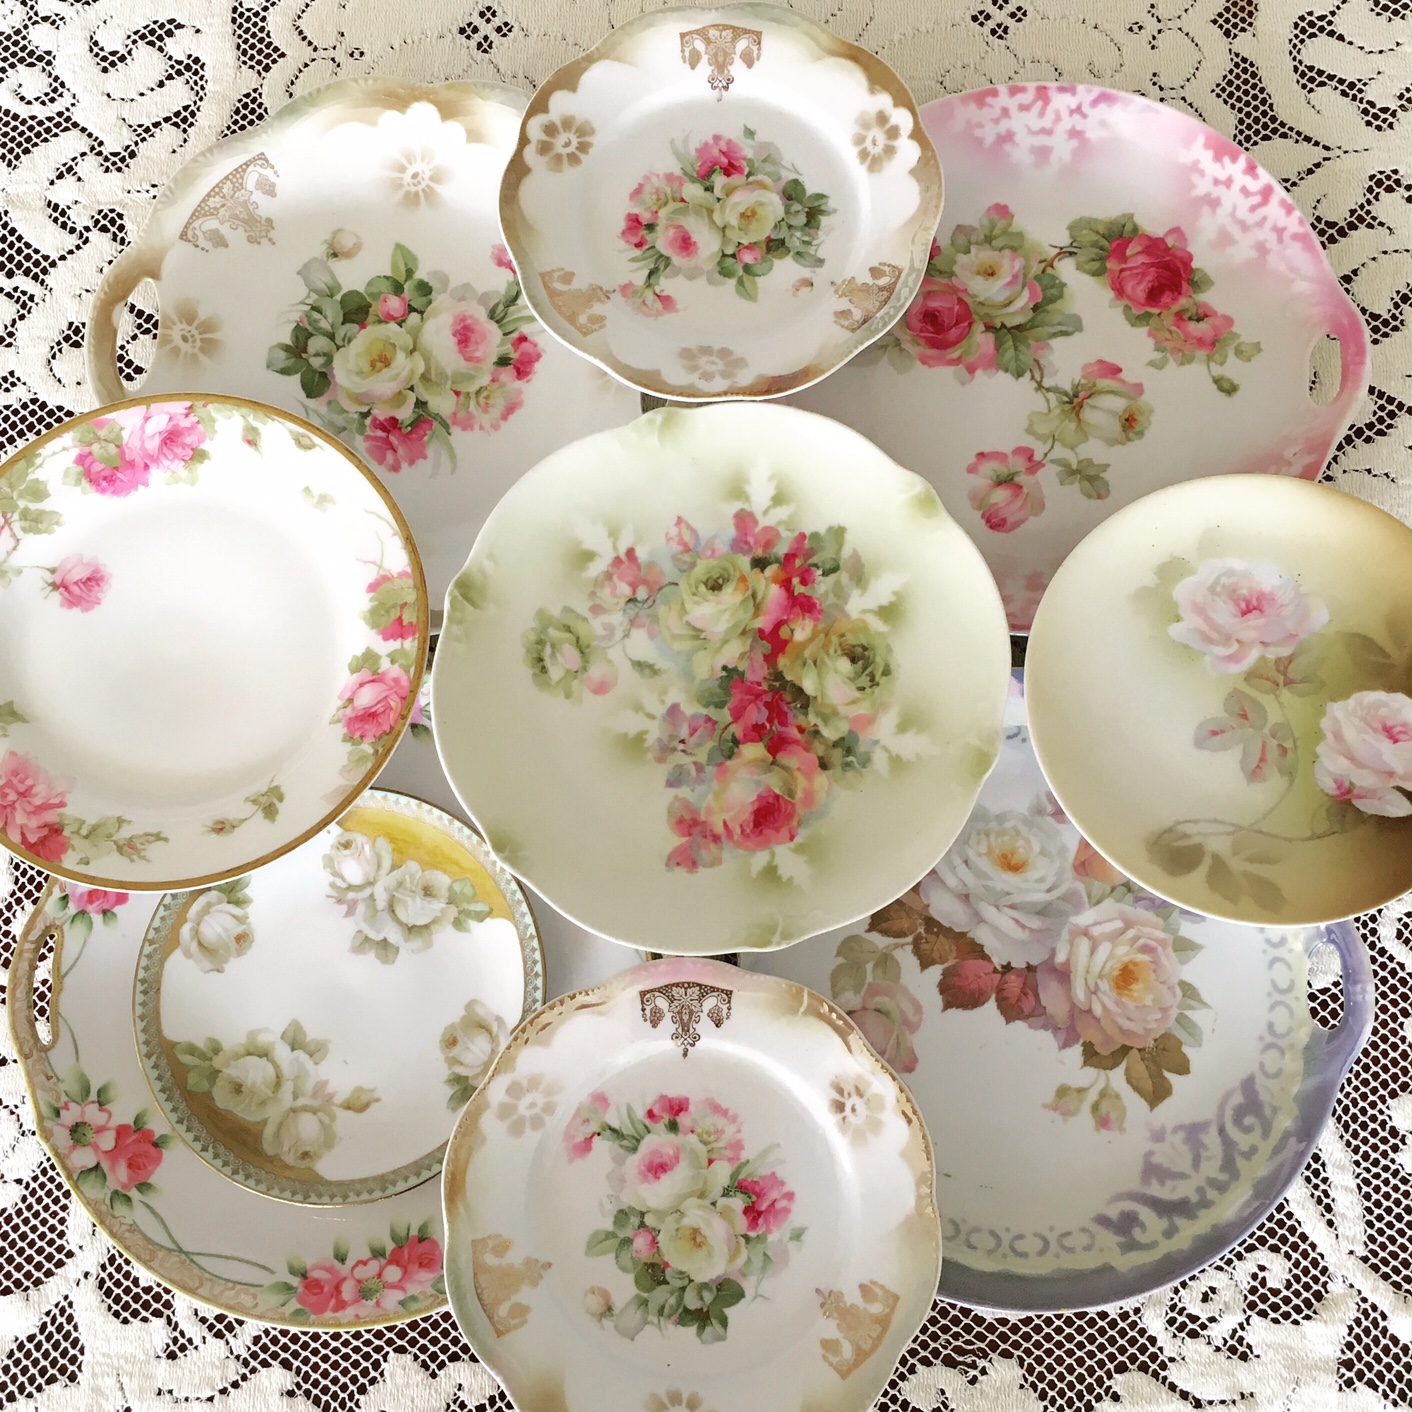
We have a nice collection of vintage floral plates that were just itching to be on display again.

©Rhiann Wynn-Nolet
There's one behind the pink hobnail glass piece on the left and she used them on the right side of the mantel too. That ornate gold frame is completely empty by the way, and we like it that way. It's such a gorgeous piece in and of itself, it really doesn't need any art inside!

© Rhiann Wynn-Nolet
Then Rhiann found a little brass bowl, and wanted to see how that looked with some shells and rocks. Note the organic (shells and greenery).

© Rhiann Wynn-Nolet
Then Mother's Day rolled around and Rhiann had to add the lovely milk glass covered box she received! That milk glass bud vase is holding one of our first New Dawn roses of the year.

©Rhiann Wynn-Nolet
She decided to turn the "pretty" to full volume on the left too.

© Rhiann Wynn-Nolet
Now that it's Memorial Day, Rhiann thought a summer-by-the-water vibe was in order. No, unfortunately we no longer live near the ocean, but it's still nice to remember those days. Here the three elements are the painting, the shell box, and the creamer with feathers. Aren't those feathers amazing? We found them on a walk with our dogs. They probably belonged to a turkey vulture. Those are both the "organic" element and the unexpected one. They add a little wildness to the composition that keeps it from looking too dull.

© Rhiann Wynn-Nolet
Here's the right side. Note that there's a bird here too. Have you noticed how brass is back in a BIG way? From knicknacks to lighting, brass is hot! Here we have five elements. The shell box, the brass crane, the books, the conch shell, and the mother of pearl necklace. There's that unexpected element again. Jewelry isn't normally part of mantel decor, but here it works because it's made of mother of pearl sourced from the ocean, and the color is harmonious.

© Rhiann Wynn-Nolet
Finally, here's the whole shebang...

© Rhiann Wynn-Nolet

This week there's no #MagpieMonday, but we hope you'll join us on Instagram June 6, when we'll be ready to see all your thingummies and gewgaws once again!

©Rhiann Wynn-Nolet
You can also play along with our #HometownCapture hashie any time. Follow us, post a pic of your hometown with the # in the text, and tag us!

© Rhiann Wynn-Nolet
Daisy and Buster have been enjoying the backyard. Literally. They both love eating grass. We don't love all the gacking that follows...

Daisy © Rhiann Wynn-Nolet

Buster © Rhiann Wynn-Nolet

Tell us how you like to decorate for spring and summer. We'd love to hear. Hope to see you again soon!


Quince Cottage Style is #agrarianchic - a mix of old and new, rustic and opulent.
Our goal is to make our new subdivision house look inviting, beautiful, 
and as though it wasn't born yesterday!

Friday, May 13, 2016

DIY: Tiling the Kitchen Backsplash

Welcome to Quince Cottage! Or, welcome back, if you've visited before.
Today we're going to talk about tile. More specifically, how to add some visual interest without breaking the bank or taking on a monumental project.
In a later post, we'll show you how we handled the rest of our backsplash with thin-brick, but for now we're focusing on the short wall behind the sink.
We didn't want to carry the brick through here, because architecturally it wouldn't have made much sense. But a plain old sheetrock wall is so ho hum, not to mention it can get stained from all the sink activities AND it's not exactly waterproof.
We considered subway tile, but we've BTDT and wanted something more interesting. Pinterest has been peppered with cool tiles lately and after some browsing, we headed out to Traditions In Tile at Brier Creek in Raleigh. This is a specialty tile store so their selection was far more extensive than the big box home improvement places. The staff was knowledgeable and friendly and we'd highly recommend them!
Our kitchen color palette is soft creamy white, gray, and bronze, with stainless steel appliances. It made sense to choose a tile that was warm white and gray.

© Rhiann Wynn-Nolet

The tiles came in either matte or gloss finish. We went with the matte because it looked softer and older.
If your tiles are patterned and mixed, like ours, lay out the design you want before you start setting them.
Happily, these tiles come mixed in a box and one box was more than enough to cover the area. Obviously before you purchase anything you need to do the math, length x width, plus at least 10% over that for breakage. A 12" x 12" tile came fairly close to filling our space, but there was a sizable gap both top and bottom. You'll see how we addressed that later on.

First you'll want to remove outlet covers. Because the tile adds thickness to the wall, you'll also need to bump your outlets forward using plastic spacers. These can be found at any big box home improvement store.

After you're done with the outlets, draw a level pencil line along the wall, so you'll have a guide for laying the tile. Why yes, those are bats on our dining room wall - we actually did this project back in October...

© Rhiann Wynn-Nolet
Butter the back of the first tile with mastic adhesive. This is the adhesive we used.
Available at Lowe's © Rhiann Wynn-Nolet
Then you'll butter the back of your first tile with the adhesive.

© Rhiann Wynn-Nolet
Be sure to have a couple of damp rags available to take care of any blobs that fall off your notched trowel. Good idea to cover your counters with newspaper too.

© Rhiann Wynn-Nolet
Use the notched edge of your trowel to make grooves in the adhesive as seen above, and then stick the tile on the wall. Be sure it's lined up correctly and then press firmly for a few seconds. Repeat with each tile, using spacers between tiles and below them to keep them in place.

© Rhiann Wynn-Nolet
Cutting the tile to fit around outlets is best done with a wet saw. Measure twice, cut once! You can see that we used narrow stock trim pieces to fill much of the gap between granite ledge and the top of the tile, leaving only a reasonable amount to be filled with grout. We painted them our trim color first.

© Rhiann Wynn-Nolet

© Rhiann Wynn-Nolet
After the tile has set, (wait at least 24 hours) apply grout, wipe off the excess and any remaining "haze" with a dampened sponge and allow the grout to dry thoroughly (at least 24 hours is a good rule of thumb).
The final step is applying a bead of caulk between the counter and the bottom edge of the tiles. This fills the gap and keeps any water from getting between your wall and your counter.

© Rhiann Wynn-Nolet
Here's what it looks like all finished!

© Rhiann Wynn-Nolet
As always we like to share a cute Irish JRT photo with you before you leave. Here's Buster in his preferred sleep position...

Buster © Rhiann Wynn-Nolet

Don't forget to follow us on IG here and play along with our hashtag, #MagpieMonday where collectors share their favorite obsessions and we choose a favorite to feature in our gallery.

© Rhiann Wynn-Nolet


Quince Cottage Style is #agrarianchic - a mix of old and new, rustic and opulent.
Our goal is to make our new subdivision house look inviting, beautiful, 
and as though it wasn't born yesterday!

Friday, April 22, 2016

Recipe: Lemon 7Up Bundt Cake

Welcome to Quince Cottage!
As you may already know, we like to mix it up a little. While the majority of our posts are decor-related/DIYs, occasionally we share a favorite recipe. Which brings us to this cake, which Rhiann first enjoyed quite a few years ago at a work party. Credit goes to "Karen", and honestly we don't know where Karen got the recipe. At any rate, it's a keeper! The crust gets almost crunchy like a cookie, while the inside is moist and tender. Plus, the lovely lemon flavor. It's all good!
Now that it's feeling spring-like down here in the South, a lemony dessert seems like just the thing. So, wouldn't you know, the one ingredient Rhiann forgot to buy was the lemon extract! She only realized this after getting all the other ingredients out of the fridge and pantry. Good thing there's a grocery store about five minutes away. And on a positive note, that gave the soda time to come to room temperature, so all's well that ends well, right?

© Rhiann Wynn-Nolet
Ingredients:

8 oz. whipped butter
1/2 C Crisco shortening
8 oz. 7Up (room temperature)
5 eggs
1 tsp vanilla
1 tsp lemon extract
3 C flour
3 C sugar

Optional Glaze Ingredients:

1 stick butter
1 small package cream cheese
1 tsp vanilla
3/4 C confectioner's sugar
(Combine butter and cream cheese. Add vanilla and mix in. Add confectioner's sugar, 1/4 C at a time).

Directions:

1. Combine first 6 ingredients, in order (add eggs one at a time). We used a stand mixer with the whip attachment and if we'd had a splash guard, we would have used it. Don't worry if it seems like the soda and the butter/Crisco combo will never become "one". Once you add the eggs, things start to improve (but still look pretty funky).
2. Mix sugar and flour together and then add to wet mixture in batches. Once the batter is smooth, it's ready to pour in the pan.
3. Grease a bundt pan. We used cooking spray and it didn't work 100%, so greasing might be better.
4. Cook at 300 degrees F for one hour (put cake in when the oven is cold). Raise oven temperature to 350 degrees F and cook 15 more minutes.
5. Allow to cool 15 minutes and then remove from pan.
6. Allow to cool thoroughly before glazing if you do the glaze. We sprinkled confectioner's sugar instead, which did a fairly decent job of camouflaging the spots where the cake didn't unmold perfectly.

Here's what the cake looked like when first removed from the oven.
© Rhiann Wynn-Nolet
Here are a few more pix...
© Rhiann Wynn-Nolet
© Rhiann Wynn-Nolet
Would you like a slice?
© Rhiann Wynn-Nolet
We enjoyed just as much the next night! By the way, that stiped table treatment was an earlier DIY, if you want a closer look, see it here.

© Rhiann Wynn-Nolet
Isn't that rose pretty? Our rose bushes just started blooming a week or so ago.

© Rhiann Wynn-Nolet
Now it's time for a cute terrier pic!

Buster © Rhiann Wynn-Nolet
Don't forget about #MagpieMonday on IG. Follow us here to learn more.

© Rhiann Wynn-Nolet

© Rhiann Wynn-Nolet


Quince Cottage Style is #agrarianchic - a mix of old and new, rustic and opulent.
Our goal is to make our new subdivision house look inviting, beautiful, 
and as though it wasn't born yesterday!

Friday, March 18, 2016

DIY--Memory Box

Welcome to Quince Cottage!
Today we have another shadowbox DIY to share.
When his dad died a little while ago, Ron wanted to find a way to remember him that went beyond a simple framed photo. Along with Ray's golf clubs, which might or might not ever see service, Ron inherited a small collection of personal items: a tie, some photos, a couple of rollerskating medals, etc.
To keep these special mementos safe but visible, Ron created a shadowbox. The box itself he got at Michael's. Ron's dad worked at a shoe factory in Manchester, New Hampshire when he was very young, so we found a wooden shoe form at a local antique store. It's a tiny, child-sized one, just right for this purpose. A small piece of leather behind the mold reinforces the shoe-making idea and highlights the shape of the mold.

© Rhiann Wynn-Nolet
As you can see above, Ray was an early fan of the selfie! He also enjoyed skiing in New Hampshire's spectacular White Mountains. Some of Ron's funniest stories involve family ski trips.
Ray's wristwatch is in the photo below. Despite the watch, Ray was chronically late (this might be a genetic thing, although Ron's never actually left either of our children standing lonely on a street corner waiting to be picked up). While punctuality wasn't a strong suit, Ron credits his dad with instilling an appreciation of Nature, and that's why there's a bird feather.
As you may already have noted, Ron used a variety of objects in this shadowbox, some two-dimensional and some three-dimensional. Some are black/white, others have color. There's a mix of "hard" materials (metals and wood) and softer ones (fabric and the feather). All these contrasts, along with a variety of shapes, help to give the composition visual interest.

© Rhiann Wynn-Nolet
Ray met his future wife, Irene, when he was very young. In fact he was only sixteen when they got married! (She was a little bit older). They enjoyed rollerskating together and if the medals indicate anything, apparently they were pretty good at it!

© Rhiann Wynn-Nolet

Ron included one of Ray's ties, and a photo of him wearing that very same tie.

© Rhiann Wynn-NOlet
Unfulfilled by his job making shoes, Ray started his own business building houses. He became well known in the area for his fine reproduction Colonials. Ron spent a few summers helping out and learning about house design and construction. With that in mind, Ron papered the back of the shadowbox with woodgrain paper and included both a compass (which had been Ray's) and a rusty old nail (near the feather).

© Rhiann Wynn-Nolet
I apologize for the distracting reflections in the glass, try as I might I couldn't find an angle where those were not an issue. SO frustrating! But I digress...
If you're assembling a shadowbox, play around with the placement of objects before fixing any of them into permanent position. The photos in this box are straight up and down, but if you'll notice, some of the other items (tie, feather, nail) are placed at angles. Again, this is a matter of personal taste, but the idea was to make the composition less static and more dynamic - moving the viewer's gaze around. Use whatever adhesive makes sense given the materials you're using (hot glue, regular glue, etc.).
We'll close up this DIY with a picture of Ray, looking very French-Canadian (he was born in Quebec). It's nice to have these tangible reminders of a loved one and their life story, both for Ron and for our children, who knew Pepere only as an elderly man.

© Rhiann Wynn-Nolet
Tell us what you think, have you made a shadowbox before? What was its purpose? Strictly decorative or something more?
Oh, wait...we can't say farewell without a cute Irish Jack Russell pic! This was taken a week or so ago on a walk by the Neuse River. As you can see Buster (aka Pork Chop) is keenly focused on the treat in my hand. Daisy is scanning the woods beyond, ever hopeful of finding a squirrel. Preferably a fat, elderly one, with a limp and poor eyesight.

Buster & Daisy © Rhiann Wynn-Nolet
And one more thing! Don't forget to join us here on Instagram for our #MagpieMonday fun. If you collect decorative items of any kind, you're going to love it!

© Rhiann Wynn-Nolet

Quince Cottage Style is #agrarianchic - a mix of old and new, rustic and opulent.
Our goal is to make our new subdivision house look inviting, beautiful, 
and as though it wasn't born yesterday!

Saturday, February 27, 2016

Transitioning the Mantel to Early Spring!

Hello there, welcome to Quince Cottage!
We love every season here in North Carolina and we try to savor each for its unique natural beauty. We do this not only through daily doggy walks, but in our decor as well.
Having said that, we're getting a teensy bit tired of the dull browns and grays of late winter. So when we received a beautiful gift from a dear friend, that was all the excuse we needed to tweak our mantel display with a sneak peek of spring.
If you didn't visit us during the winter, here is our holiday mantel.

© Rhiann Wynn-Nolet
And here is our post-holiday-but-still-winter mantel.

© Rhiann Wynn-Nolet
And now, here's a view of the right side of our mantel.

© Rhiann Wynn-Nolet
See those rose plates? They were in storage until Rhiann got them out for an IG post about collections for the MagpieMonday hashtag she cohosts.

© Rhiann Wynn-Nolet
Aren't they pretty?
Here's the left side of the mantel. That gorgeous pink hobnail covered compote is the gift we received from our friend Juls. She's an extremely creative and obviously generous person, with fabulous taste. Here's a link to her Instagram , she is definitely one to follow.

© Rhiann Wynn-Nolet
You might have spied our recent shadowbox project up above as well. Click here for the DIY if you're curious. And now for the whole shebang... We'd originally planned to take the crystal garland down along with the other winter decor, but it's just so pretty we're leaving it up for now.

© Rhiann Wynn-Nolet
Are you decorating for spring yet? What are your favorite spring themes?
We mentioned #MagpieMonday earlier. Follow us on IG here for more about that.

© Rhiann Wynn-Nolet
Now it wouldn't be right to leave you with no doggy pictures, so here here you go! Buster in front, Daisy being camera-shy.

Buster & Daisy © Rhiann Wynn-Nolet

Quince Cottage Style is #agrarianchic - a mix of old and new, rustic and opulent.
Our goal is to make our new subdivision house look inviting, beautiful, 
and as though it wasn't born yesterday!