Design. Create. Decorate.

Design. Create. Decorate.
Showing posts with label wreath. Show all posts

Saturday, February 20, 2016

DIY Coffee Filter Wreath

Welcome to Quince Cottage!
If you're on Pinterest, no doubt you've seen a coffee filter wreath, and maybe even made one yourself. But if you haven't, and are feeling crafty on a small scale, here's a quick how-to.
You will need: a wreath form, 2 packages of paper coffee filters (8-12 cup size), a hot glue gun, a good sized artist's paint brush or a Sharpie. You can also use a piece of twine if you want to create a way to hang the wreath easily after completing it. This wreath is easy to make and quite inexpensive (about $10).

© Rhiann Wynn-Nolet
My advice is to leave the straw wreath wrapped in plastic, less mess and better adhesion. You could use a foam wreath form if you prefer. I used a length of twine and tied it around the straw form in two places so that I'd have an easy method for hanging this sucker just about anywhere.

© Rhiann Wynn-Nolet
Load and heat your glue gun. Put your capped Sharpie or the non-working end of the paint brush in the center of the filter and pull the sides up around it like a closed umbrella. Dab glue on the filter where you've created a small area for contact with the wreath form. Using the marker or paintbrush allows you to poke the filter into place without getting hot glue burns (well, okay, I did burn myself twice, but it had nothing to do with using the helper paint brush).

Start with the inner part of the wreath (around the central hole). Work in ever-expanding concentric rings from that first inner circle. In retrospect I think I packed the filters a little too densely. You can easily leave an inch between filter contact points and your wreath will turn out great. I fully intended to take a photo "during", but my glue gun had other ideas and was churning out molten glue so fast I never got to take a break.

Once you're finished, you can trim off any filter edges that protrude past where they should. Here is the finished product adorning the rusty windmill head on the planked wall in our dining room. I think it makes a nice, fresh-looking warm weather wreath, but it's also quite suitable for a white winter holiday scheme. By the way, if you're interested in the planked wall DIY, click here.

© Rhiann Wynn-Nolet
We hope you've enjoyed this quick and easy project. Buster and Daisy aren't all that interested in artsy-craftsy pastimes...

Naptime for Daisy and Buster © Rhiann Wynn-Nolet

Remember Mondays are #MagpieMonday on Instagram, where you get to show off your collections of decor items. Follow us here to learn more.

© Rhiann Wynn-Nolet

Quince Cottage Style mixes old and new, rustic and opulent.
Our goal is to make our new subdivision house look inviting, beautiful, 
and as though it wasn't born yesterday!

Friday, December 4, 2015

Quince Cottage Holiday Home Tour

Welcome to Quince Cottage!
We've been busy adding holiday touches to our home and we'd like to share them with you.
Let's begin with a few photos of our front porch.

© Rhiann Wynn-Nolet
© Rhiann Wynn-Nolet

© Rhiann Wynn-Nolet
© Rhiann Wynn-Nolet
Isn't that red and white metal picnic basket fun?

As you can see, we didn't hang the snowflake garland straight across, you know, the "normal" way. Instead we wanted to give the effect of a little snow flurry in one corner of the porch.

Once inside, we moved some of our milk glass to the cubby display, and added some greenery, cotton, plaid, and vintage Shiny Bright ornaments.

© Rhiann Wynn-Nolet
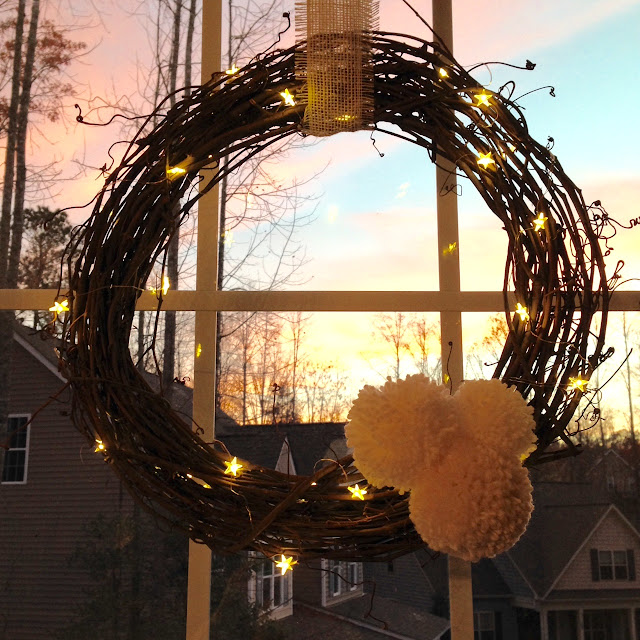
In the dining room, we hung a pompom twig wreath in each of the four windows. For the DIY, click here.

© Rhiann Wynn-Nolet
© Rhiann Wynn-Nolet

We also assembled our snowman collection on our buffet, and did a quick 'n' easy greenery arrangement in our $5 yard sale silver-plated champagne bucket.

© Rhiann Wynn-Nolet

© Rhiann Wynn-Nolet

And we've been playing around with various table settings. Here's one featuring more of our milk glass collection (and more pompoms).

© Rhiann Wynn-Nolet

Okay, Rhiann is a bit obsessed with pompoms.
On to the living room! We filled the basket on our coffee table with greenery, a candle, and a jumbo pine cone we picked up (literally) on the University campus in Wilmington (wish we'd taken some more).

© Rhiann Wynn-Nolet
As you can see, we've done a gallery wall behind the sofa. We have a plan for what to put in the picture frames, but for now we used leftover scraps of fabrics we've used for pillows in the room.

We were so happy to have this antique cabinet for a display space. We'll be doing a DIY post on how we freshened up its look. Right now it's playing host to our collections of white pitchers and mercury glass, and to a winter wonderland just for our Snow Babies. The greenery up on top is an ordinary fake evergreen garland, augmented with more artificial greenery, glass ornaments, an owl, and some wired burlap ribbon.

© Rhiann Wynn-Nolet

© Rhiann Wynn-Nolet
© Rhiann Wynn-Nolet
A close up...

© Rhiann Wynn-Nole

Our mantel is always Rhiann's favorite part of the house to decorate.

© Rhiann Wynn-Nolet
The morning sunlight is really pretty, don't you think? Even better with the fire lit!

© Rhiann Wynn-Nolet

© Rhiann Wynn-Nolet
© Rhiann Wynn-Nolet
This is a close up of the left side. We just love using cotton, and this is the real deal, not the artificial version. We're lucky to have cotton fields in our part of North Carolina. For those of you who might not have seen what one of those looks like, here you go.

© Rhiann Wynn-Nolet
© Rhiann Wynn-Nolet
Magical isn't it?
Here's a close up of the right side of the mantle. We're totally in love with that rusty bird and vine garland. We got it at a shop called Affordable Chic in Raleigh.

© Rhiann Wynn-Nolet

Here's our house angel. Rhiann made a little seasonal crown for her. She looks pleased.

© Rhiann Wynn-Nolet

Finally, the piece de resistance, our Christmas tree! This year we took some branches from a nearby wooded area, gave them a "birch" look with some white paint, wired glass icicles onto them, and stuck them into the tree. The topper is paper. Our ornaments are mostly glass and have been collected over time.

© Rhiann Wynn-Nolet
© Rhiann Wynn-Nolet
Look what we found this year to add to the tree!

© Rhiann Wynn-Nolet
Here's a last little touch of Christmas - can you believe we scored these vintage Shiny Bright ornaments at a charity thrift shop for $1.79 (for all 15 of them!)?

© Rhiann Wynn-Nolet

Buster and Daisy have been VERY good doggies.

© Rhiann Wynn-Nolet

Quince Cottage Style mixes old and new, rustic and opulent.
Our goal is to make our new subdivision house look inviting, beautiful, 
and as though it wasn't born yesterday!

Friday, November 27, 2015

DIY PomPom Twig Wreath

Welcome to Quince Cottage!

Holiday decorating is well underway here and we're hoping to share a few ideas with you this season.
Wreaths are a must at this time of year, right? And pompoms have never been more popular. Why not unite these two in a destined-to-become-classic decoration?
First you need to buy or make a twig wreath. We got ours for $3.99 each at Hobby Lobby.

Twig wreath © Rhiann Wynn-Nolet
You'll also need florist's wire, wire cutters, and craft lights (we got our lights at Michael's), as well as AA batteries for the lights. These lights come in multiple shapes, we chose stars. We like the programmable ones that go on at a designated time and then turn themselves off six hours later.

© Rhiann Wynn-Nolet
We bought a pompom-maker that creates four different sizes.

© Rhiann Wynn-Nolet
Hint 1: to make fluffy pompoms fast, use chunky yarn.

Hint 2: When you tie a piece of yarn around the middle of the in-progress pompom, leave several extra inches hanging loose. This will come in handy later. (See photo below).

For our wreath we used two different yarns and two different sized pompoms. We made three pompoms per wreath.

© Rhiann Wynn-Nolet
Put batteries in the box attached to the lights, then use florist's wire to attach the box to the back of the wreath. Next wrap the lights around the wreath.
Now, tie the pompoms together to make a cluster, and then tie the cluster to the wreath.
Finally, cut a length of ribbon to hang the wreath.

© Rhiann Wynn-Nolet
Here are some photos of the finished wreaths.

© Rhiann Wynn-Nolet

© Rhiann Wynn-Nolet
© Rhiann Wynn-Nolet
© Rhiann Wynn-Nolet

We hope you enjoyed your visit!

Quince Cottage Style mixes old and new, rustic and opulent.
Our goal is to make our new subdivision house look inviting, beautiful, 
and as though it wasn't born yesterday!

Buster and Daisy hope y'all had a Happy Thanksgiving!
They like Thanksgiving because it's all about eating and napping, two of their favorite pastimes.

Buster and Daisy © Rhiann Wynn-Nolet