Design. Create. Decorate.

Design. Create. Decorate.

Friday, April 22, 2016

Recipe: Lemon 7Up Bundt Cake

Welcome to Quince Cottage!
As you may already know, we like to mix it up a little. While the majority of our posts are decor-related/DIYs, occasionally we share a favorite recipe. Which brings us to this cake, which Rhiann first enjoyed quite a few years ago at a work party. Credit goes to "Karen", and honestly we don't know where Karen got the recipe. At any rate, it's a keeper! The crust gets almost crunchy like a cookie, while the inside is moist and tender. Plus, the lovely lemon flavor. It's all good!
Now that it's feeling spring-like down here in the South, a lemony dessert seems like just the thing. So, wouldn't you know, the one ingredient Rhiann forgot to buy was the lemon extract! She only realized this after getting all the other ingredients out of the fridge and pantry. Good thing there's a grocery store about five minutes away. And on a positive note, that gave the soda time to come to room temperature, so all's well that ends well, right?

© Rhiann Wynn-Nolet
Ingredients:

8 oz. whipped butter
1/2 C Crisco shortening
8 oz. 7Up (room temperature)
5 eggs
1 tsp vanilla
1 tsp lemon extract
3 C flour
3 C sugar

Optional Glaze Ingredients:

1 stick butter
1 small package cream cheese
1 tsp vanilla
3/4 C confectioner's sugar
(Combine butter and cream cheese. Add vanilla and mix in. Add confectioner's sugar, 1/4 C at a time).

Directions:

1. Combine first 6 ingredients, in order (add eggs one at a time). We used a stand mixer with the whip attachment and if we'd had a splash guard, we would have used it. Don't worry if it seems like the soda and the butter/Crisco combo will never become "one". Once you add the eggs, things start to improve (but still look pretty funky).
2. Mix sugar and flour together and then add to wet mixture in batches. Once the batter is smooth, it's ready to pour in the pan.
3. Grease a bundt pan. We used cooking spray and it didn't work 100%, so greasing might be better.
4. Cook at 300 degrees F for one hour (put cake in when the oven is cold). Raise oven temperature to 350 degrees F and cook 15 more minutes.
5. Allow to cool 15 minutes and then remove from pan.
6. Allow to cool thoroughly before glazing if you do the glaze. We sprinkled confectioner's sugar instead, which did a fairly decent job of camouflaging the spots where the cake didn't unmold perfectly.

Here's what the cake looked like when first removed from the oven.
© Rhiann Wynn-Nolet
Here are a few more pix...
© Rhiann Wynn-Nolet
© Rhiann Wynn-Nolet
Would you like a slice?
© Rhiann Wynn-Nolet
We enjoyed just as much the next night! By the way, that stiped table treatment was an earlier DIY, if you want a closer look, see it here.

© Rhiann Wynn-Nolet
Isn't that rose pretty? Our rose bushes just started blooming a week or so ago.

© Rhiann Wynn-Nolet
Now it's time for a cute terrier pic!

Buster © Rhiann Wynn-Nolet
Don't forget about #MagpieMonday on IG. Follow us here to learn more.

© Rhiann Wynn-Nolet

© Rhiann Wynn-Nolet


Quince Cottage Style is #agrarianchic - a mix of old and new, rustic and opulent.
Our goal is to make our new subdivision house look inviting, beautiful, 
and as though it wasn't born yesterday!

Sunday, April 17, 2016

DIY - Upcycled Fountain

Welcome to Quince Cottage!
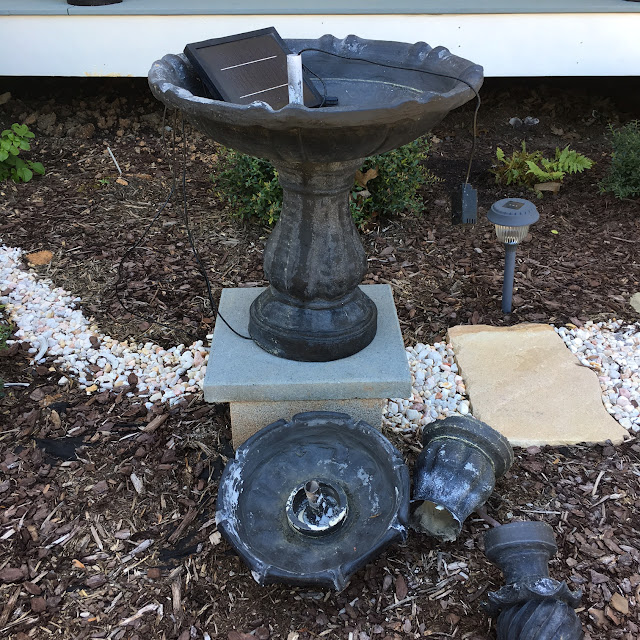
When you spend a couple of hundred dollars on a solar-powered fountain, you kind of expect it to last more than two years. Well, at least we did. When ours stopped working at the end of last summer it was hard to determine why. Was it the pump? Was it the solar panel? Was it the wiring?

Last summer in the garden © Rhiann Wynn-Nolet
We used our dead fountain for Halloween. It seemed appropriate...

Macabre © Rhiann Wynn-Nolet
It sat in our courtyard garden all winter, basically waiting for the upcoming neighborhood big clean up, when we planned to heave it into the dumpster. And then we had a bit of storm, and it blew over and pieces of it broke, so at that point we no longer had any guilt at all about tossing it.

Toast © Rhiann Wynn-Nolet

But then Rhiann had an idea. Why not take the remaining intact pieces and use it for a container garden?
The steps were so easy it didn't even need documenting. Basically she filled the bottom with a layer of gravel, to add both weight and drainage. Next she added potting soil. Then came the plants and more soil, topped with a layer of mulch to retain moisture and keep the dirt from blowing out.
Ta-daaa! Done!

Close up © Rhiann Wynn-Nolet
Fountain garden © Rhiann Wynn-Nolet
All's well that ends well © Rhiann Wynn-Nolet
Let's pretend you don't see that folded up pile of old sheets in the chair (we had a frost a week or so ago and used them to cover up our roses).
There's still the top bowl of the fountain that we might do something with too - like a succulent garden. How trendy would that be?

Here's that cute Jack Russell Terrier pic you were waiting for!

Daisy & Buster © Rhiann Wynn-Nolet
Don't forget to follow us on Instagram here and join us for #MagpieMonday !

© Rhiann Wynn-Nolet
See you around!

Quince Cottage Style is #agrarianchic - a mix of old and new, rustic and opulent.
Our goal is to make our new subdivision house look inviting, beautiful, 
and as though it wasn't born yesterday!

Friday, April 8, 2016

Chocolate Chip Banana Bread

Welcome back to Quince Cottage! Did you come because of that delicious aroma you smelled? We thought so...
Banana Bread is the go-to when those bananas you bought a few days ago have been malingering in the fruit bowl a little too long. This recipe will use up two of those dark, mushy dudes and make anyone within sampling distance pretty darn happy.
Just look at that slightly crunchy exterior and all the melty chocolate goodness inside. Yummo!

© Rhiann Wynn-Nolet
Ingredients:
1/4 C butter
2/3 C white granulated sugar
2 eggs
1/2 tsp vanilla (real, not imitation)
8 oz. plain Greek yogurt
2 bananas, mashed
2 C flour
1/4 tsp baking powder
1/2 tsp baking soda
3/4 tsp salt
1 C milk chocolate chips

Directions:
1. Spray loaf pan with cooking spray. Preheat oven to 350 degrees F.
2. Combine flour, baking powder, baking soda, and salt. Stir in chocolate chips. Set aside.
3. Melt butter in a large bowl in the microwave (you want it melted, not boiling hot).
4. Stir the sugar and then the vanilla into the melted butter.
5. Add eggs, one at a time, keep stirring so the cold eggs don't make the butter get lumpy.
6. Stir in bananas, then yogurt.
7. Add dry ingredients to wet ingredients in 3-4 batches, stirring to moisten after each addition.
8. Pour batter into pan.
9. Cook 55-65 minutes. Check for doneness with a toothpick.
10. Let cool 10-15 minutes and then remove from pan.

Tempting though it will be to dive right in, you should wait a half hour or so before slicing. Otherwise you are less likely to get nice, neat slices, and more likely to get a pile of crumbs (which will be delicious, but not as pretty).

© Rhiann Wynn-Nolet
And of course, a Jack Russell pic. It wouldn't be a Quince Cottage post without one. This is Buster. I have no idea why he looks so sad - he leads a very pampered life.

Buster © Rhiann Wynn-Nolet

Quince Cottage Style is #agrarianchic - a mix of old and new, rustic and opulent.
Our goal is to make our new subdivision house look inviting, beautiful, 
and as though it wasn't born yesterday!

Saturday, April 2, 2016

DIY Ugly Duckling Swan

Welcome to Quince Cottage!
Are you on Instagram and/or Pinterest? Well, we are - find us here on Instagram and Pinterest.
Do you ever get inspired and want to recreate something you've seen? We do!
Case in point, was our choice for last week's #MagpieMonday. If you don't know what #MagpieMonday is all about - it's a showcase for collectors to share their decor treasures on IG. We never ever use the "h" word (hoarder), and we always have a lot of fun. Each co-host chooses a favorite collection to feature in their gallery and in the following week's meme. We fell in love with the lovely carved bird collection you see in this photo below.

© Rhiann Wynn-Nolet
Anyway, to make a long story short, Rhiann was out thrifting last week and came across this not-so-lovely bird. It might be wood, it's more likely plastic or some sort of resin. It was one of a pair, but she bought only the one for $10. (Sorry, lonely ugly bird still at the thrift shop).

© Rhiann Wynn-Nolet
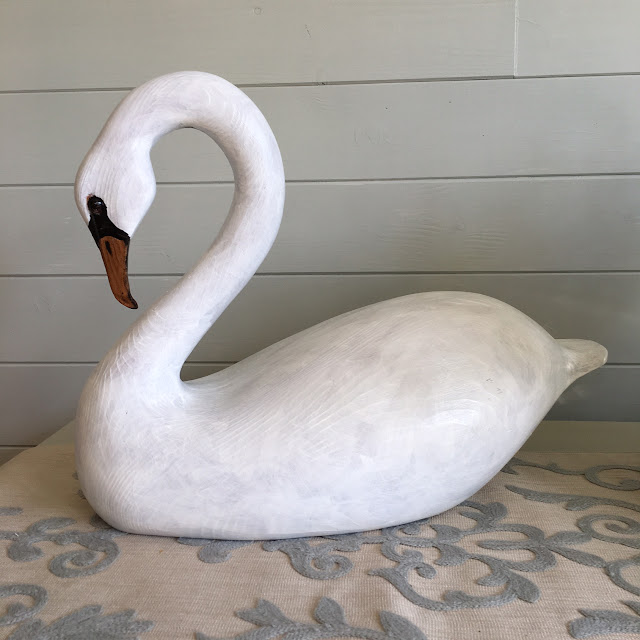
Next she bought some basic WalMart craft paints in white and black, and then searched the interwebs for photos of swans to study the facial markings. Then she got to work. It took three coats of the white, but only one of the black to get the effect she wanted.

© Rhiann Wynn-Nolet
© Rhiann Wynn-Nolet
Here's the swan on the dining room buffet.
So, what do you think? What should we name him/her? Tell us your thoughts in comments.

© Rhiann Wynn-Nolet
And a little closer up...

© Rhiann Wynn-Nolet
So, that wraps up our quick and easy DIY.
On to another topic. Do you love old houses as much as we do? Here in North Carolina we often see old homes that look abandoned (sometimes they are, other times there's actually someone living there). We weren't sure which was the case with this lovely old place in Snow Hill.
If it truly is abandoned, would you want to go inside?

© Rhiann Wynn-Nolet
As always, we'll leave you with a photo of one of our cute Irish Jack Russell Terriers. This is Daisy. Thank you for visiting! We hope you'll come back soon.

Daisy © Rhiann Wynn-Nolet
Quince Cottage Style is #agrarianchic - a mix of old and new, rustic and opulent.
Our goal is to make our new subdivision house look inviting, beautiful, 
and as though it wasn't born yesterday!