Design. Create. Decorate.

Design. Create. Decorate.

Monday, July 27, 2015

Recipe - Yankee Pimento Cheese

One of the things we've always enjoyed most about traveling is sampling the local cuisine. Most of the time it's been delicious! So, when we moved from Maine to North Carolina in 2013, we set about getting acquainted with East Carolina barbeque, shrimp 'n' grits, and of course, pimento cheese.

Eventually we decided to try our hands at homemade pimento cheese. We quickly discovered there are many variations out there. We prefer ours on the firm side and we like a bit of heat to add some excitement. Here's the result of our experimentation.

© Rhiann Wynn-Nolet
The photo below shows it just made - it needs to be refrigerated 4-6 hours to firm up.

© Rhiann Wynn-Nolet 

RECIPE:
Ingredients
3 oz. cream cheese
1/2 C Duke's mayonnaise*
2-3 oz. goat cheese
2 1/2 C sharp cheddar cheese, grated
4 oz. pimentos, diced and drained well
6-10 drops Sriracha
Pinch of chipotle powder
1 tsp minced fresh chives (you're right, they aren't shown in the photo, we've added them since this original post and we love them!)

Directions
1. Whip cream cheese and goat cheese in mixing bowl
2. Blend in mayonnaise
3. Blend in grated cheese, Sriracha, and chipotle powder
4. Stir in pimentos
5. Chill in covered container until ready for use

*Yes, you MUST use Duke's for this to be considered remotely acceptable fare at a Southern gathering
© Rhiann Wynn-Nolet
Here's one for you...

© Rhiann Wynn-Nolet

Now, we've seen recipes using less cream cheese and more mayo, a blend of cheddar and Monterey Jack, no Sriracha, no chipotle, and with garlic...the variations are endless. If you're a Pimento Cheese aficionado, what do you put in yours? Or is it one of those top secret, passed-down-through-generations recipes?

Thank you for visiting Quince Cottage. We hope we'll see you again soon! That goes for Buster and Daisy too!

Daisy & Buster © Rhiann Wynn-Nolet

Quince Cottage Design Mantra: Create a beautiful, comfortable home that reflects your unique style and personality. 
In our own place, patina is valued, rustic rubs shoulders with opulent (we call this "Agrarian Chic"), and you're sure to get a terrier-style welcome! And probably a plate of crackers with Pimento Cheese!

Friday, July 17, 2015

DIY Project - Fireplace Mantel

If this is your first time here, you may not realize that Quince Cottage is our brand spanking new home. Now there are LOTS of things to like about "new". We lived in a c. 1903 Craftsman Foursquare for ten years, and believe me, we know that old homes, charming as they are, can be, er, "cranky". We could tell you stories about exploding radiators, a leaking roof, and the floor-sanding disaster that led to a 911 call. Maybe some other time...
What old homes have, and new homes often lack, is character. Character shows up in a home's unique elements, those finely crafted, or even naively-crafted but nonetheless charming, details. There's the indisputable sense that the building has a longish history. How do you make a new subdivision house look as though it wasn't born yesterday? By "aging" it artificially, that's how.
Case in point: our fireplace mantel.
We were really pleased with the way our shiplap turned out. (If you missed that post, you can find it here). That really helped give our house the look of an old farmhouse. However, all that rustic loveliness made our crisp, snowy white fireplace surround look glaringly out of place.
A little while back we toured the Johnston County Parade of Homes and we saw a real, genuine old mantel installed in a new house. It looked fabulous! Here it is...

© Rhiann Wynn-Nolet
That piece of paper hanging there shows the old North Carolina plantation the mantel came from. Unfortunately, the house was being razed, but at least a part of it will live on and be treasured by a succeeding generations of home-owners.

It seemed silly-stupid to spend money and effort removing a perfectly good, traditionally shaped mantel, just to replace it with a beat up antique one.
So, given that Ron had just done a fabulous job with refinishing during the Barn Door Project , I "suggested" he employ those same skills on the mantel.

Here's what he did.

1. Tape anything around the fireplace you don't actually want to get "antiqued". Paint streaky marks and coat most edges of the mantel with brown acrylic paint (he used craft paint in a dark umber). Looks really ugly, right? Don't worry, everything will be okay.

© Rhiann Wynn-Nolet
Closeup © Rhiann Wynn-Nolet

2. Once the paint is dry, go over the brown paint with a candle, esp. the very edges (the candle is unlit, of course, it's the wax you want). Don't completely cover the brown paint, just some of it. Whatever the wax covers won't accept the next layer of paint.

© Rhiann Wynn-Nolet

3. Paint over everything with a creamy white paint. We used "Milk" Paint by Sherwin Williams.

© Rhiann Wynn-Nolet
4. Once the paint is dry, use a cloth and rub really hard over the areas painted brown. You may need to use your fingernail (covered by the cloth) to really get down to the brown for that "chipped" appearance).

Closeup © Rhiann Wynn-Nolet

5. Use a small brush to apply a thin coat of brown stain. Ron used Min-Wax Special Walnut. Make sure to get in creases and crevices for an enhanced aged effect. Quickly wipe off excess with a rag. Work in sections so that most of the brown paint comes right off.

© Rhiann Wynn-Nolet

6. Use paste wax to give everything a protective coating. Apply and buff with a soft rag.


© Rhiann Wynn-Nolet
Here's a closeup of the finished effect. Yup, all done with paint, brushes, a rag, a candle, stain, and paste wax. Ron's gotten really good at this, don't you think? He's already at work on a Top Secret Project! Don't worry, you'll get to see it eventually.

© Rhiann Wynn-Nolet
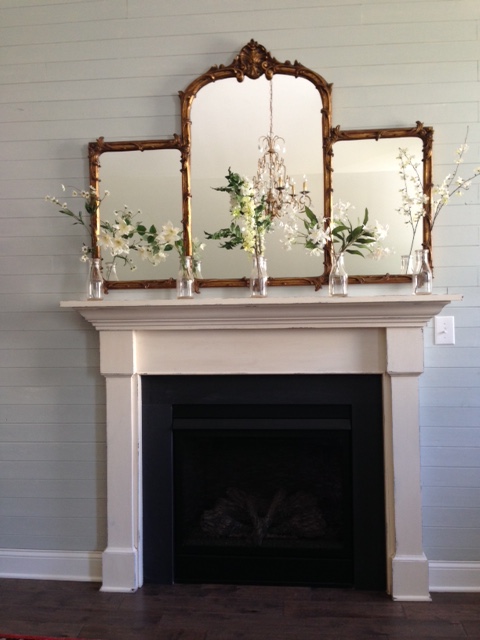
So, now all that's left is decorating. That's MY favorite part.

Ta-daaaa!!!

© Rhiann Wynn-Nolet
© Rhiann Wynn-Nolet

This mantel is a perfect example of  rustic + opulent = FABULOUS! Here at Quince Cottage, that's what we're all about.
Oh, and of course, no post would be complete without a picture of an adorable terrier. All that hard work on the fireplace was exhausting!

Buster © Rhiann Wynn-Nolet

Sunday, July 12, 2015

The Great Chocolate Chip Muffin Shortage of 2015

A very strange phenomenon occurred in our area last week. There wasn't a single chocolate chip muffin to be found in any of the three grocery stores we frequent! Although our younger daughter doesn't have a major sweet tooth (doesn't like ice cream, or cake, or most candy), she adores chocolate chip muffins and eats them regularly.
She graciously agreed to make do with corn muffins--one of her other faves. She went as a corn muffin one year for Halloween. (Yeah, that costume was a real challenge to make. Also, she got super annoyed with people who thought she was a cupcake...)

© Rhiann Wynn-Nolet

We even persuaded her to try both apple and strawberry muffins, which are totally out of her wheelhouse. She admitted (grudgingly) that they tasted "not bad".
It seemed like the perfect time to teach her how to make her own chocolate chip muffins. We found a recipe online from littlesweetbaker(dot)com. Believe it or not, I didn't turn to Pinterest this time!
These muffins were easy to make and tasted delicious!

RECIPE:
Ingredients
2 1/2 C all purpose flour
1 TBS baking powder
 1 tsp baking soda
1/2tsp salt
1/2 C unsalted butter, melted and cooled
1 C white sugar
2 large eggs
1 C buttermilk
1 TBS vanilla extract (use the real stuff, not imitation)
1 1/2 C chocolate chips (we used milk chocolate)

Directions
1. Spray muffin tin with cooking spray (I used one made from coconut oil).
2. Preheat oven to 425 degrees
3. In mixer bowl, toss together the flour, baking powder, baking soda, salt, and chocolate chips.
4. In a medium bowl, whisk together the melted butter, sugar, eggs, buttermilk and vanilla. Slowly add to the dry ingredients. Gently fold together until combined. DON'T overstir!
5. Divide batter into 6 jumbo muffin cups. Bake at 425 degrees for 5 minutes, then turn the oven heat down to 350 degrees and bake another 20 minutes.
6. Let cool for 5-10 minutes. Remove from pan.

© Rhiann Wynn-Nolet

We used the jumbo muffin tin.

© Rhiann Wynn-Nolet

She likes them straight up, no butter, with milk.


© Rhiann Wynn-Nolet


At Quince Cottage our philosophy is, "If you can't find what you're looking for, make it!" 

Wednesday, July 8, 2015

Make a Great First Impression!

Whatever you call it--entry, foyer, front hall--it makes an impact, for better or worse. We're not just talking about guests. If you enter your home through the front door, the foyer has an effect on you too.
In this post we'll discuss the interior space, because "curb appeal" (the front of your house, including your front door) deserves its own post.

With the help of Pinterest, we've analyzed the features we believe can help anyone's foyer set the right tone for the rest of their home. What do we mean by "right tone"?

An entry should be welcoming and give visitors a sneak peek of your personal decorating style.

1. Neatness - yes, entries always attract clutter, especially if they're the family entrance too. But the last thing you want is a guest tripping over a jumble of shoes and backpacks. Utilize hall trees, peg boards, closets, baskets, etc. to corral the mess. An umbrella stand isn't a bad idea either.

2. Mirror - it's not absolutely necessary, but certainly handy for last minute checks before leaving the house.

3. Greenery - connect outside and inside with real or "faux" plants. Color, shape, and container can all reflect your overall decorating theme while adding the fresh appeal of Nature.

4. Surface spacepreferably with at least a small container or storage element. Despite good intentions, mail and keys frequently end up "somewhere" in the entry. If your foyer is large enough for a dresser or case-piece with drawers, GREAT. Use them wisely. If not, a basket, bowl, or tray will do. (We have a small blue bowl on the foyer console).

5. LightingOverhead pendant, sconce(s), lamp(s) - choose fixtures to match your style and ensure ample illumination. What's more depressing than a dark hallway? Not much. Guests shouldn't feel as though they're at risk for meeting a bear or something... We don't have much natural light in our foyer, and we're considering replacing the front door at some point with one that has a larger window.

© Rhiann Wynn-Nolet

6. Color  Here's a wonderful opportunity to foreshadow the décor in the rest of the house. You have a teal sofa in the family room? Why not choose wallpaper or a rug containing that color? Or create a vignette using a teal vase or candlesticks? Changing the ratio of your primary color scheme will make everything more interesting.

7. ArtNot only is art cool in and of itself, and reflective of your interests, it can spark initial conversation. Prints, photos, maps, ceramics, they're all good...

8. Softness - Foyers tend to be full of hard surfaces, which actually aren't warm and welcoming. Rugs, or a small upholstered piece, or a pillow on a bench--any of these can add a cozy touch.

Here are a few photos of our front entry at Quince Cottage. Below is the "before" (the only interesting thing is the hanging fixture we chose).

Foyer © Rhiann Wynn-Nolet

And here's the foyer "after" we had our way with it!


The nest prints were $8 each at an antique store and we framed them with inexpensive ready-made frames.


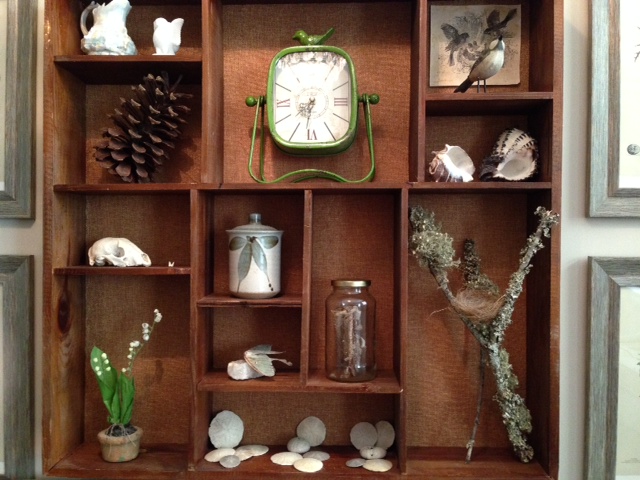
The shadow box came from HomeGoods, and what's inside reflects our love of Nature, milk glass, and travel.


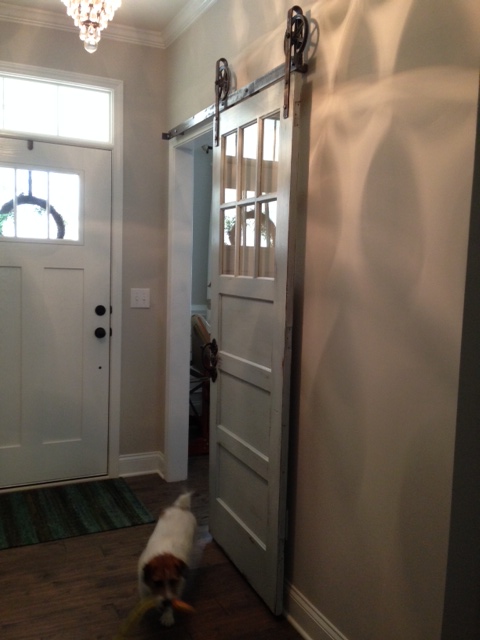
Here's the other side of the hall, and if you're curious about that rolling door, check out our earlier posts on choosing, refinishing, and installing it.


Here's a photo of the front entry in our former home in Kennebunkport, Maine.


For photos of other peoples' entries, head to our First Impressions Pinterest board.

Tell us what you think. What's the one thing your foyer can't be without?

Quince Cottage Design Mantra: Create a beautiful, comfortable home that reflects your unique style and personality. 
In our own place, patina is valued, rustic rubs shoulders with opulent (we call this "agrarian chic"), and you're sure to get a terrier-style welcome!
Here's Buster waiting for you to come back © Rhiann Wynn-Nolet

Friday, July 3, 2015

Coconut Poke Cake

Ah, summer...fireflies, farmers' markets, and humidity. Nothing's perfect, y'all. It's been feeling pretty tropical around here lately, which might just explain my craving for a coconut-y dessert. Preferably one that required very little effort.
You know what I'm going to say next, don't you? Yes, Pinterest. Where would I be without it? (Probably getting much more accomplished, but ssshhh, let that be our little secret, 'kay?)
The recipe I found came from lmld(dot)org and I tweaked it only a bit.

© Rhiann Wynn-Nolet

RECIPE:
Ingredients
1 box packaged white cake mix (and whatever ingredients it calls for, mine was Duncan Hines Classic White and I needed 3 egg whites, water, and vegetable oil).
12 oz. Cream of Coconut (found in the cocktail fixings aisle, NOT the same as coconut milk)
1 C toasted coconut
1 container Cool Whip or other whipped topping

Directions
1. Grease 9x13 baking pan
2. Mix and bake cake according to package directions. Let cool.
3. Toast coconut - spread on cookie sheet, bake at 350 degrees for 3 minutes, stir, continue baking, stirring every 2 minutes until light golden brown
4. When cake is room temperature poke holes in it with a fork.
5. Pour cream of coconut over cake slowly, allowing liquid to soak into the cake.
6. Spread whipped topping evenly over the cake.
7. Sprinkle coconut evenly over the cake.
8. Refrigerate for a minimum of a couple of hours - it really tastes better after being chilled for a while.

Just in case you aren't quite sure yet, here, feast your eyes...

© Rhiann Wynn-Nolet

Now, see how easy that was to make? Imagine putting some crushed pineapple in the cake batter, or drizzling some chocolate across the top... 

At Quince Cottage we love recipes that are 

customizable, simple to make, and delicious to eat!

Come back again soon, we're going to be talking about First Impressions and Homemade Dog Treats!

Wednesday, July 1, 2015

#Shiplap - DIY

We were looking for a way to add textural interest and farmhouse style to our new home. See? Very pretty, but a little blah.

Dining Room © Rhiann Wynn-Nolet

Dining Room © Rhiann Wynn-Nolet

Living Room © Rhiann Wynn-Nolet

In magazines, model homes, and on TV we've noticed that shiplap siding is trending, and becoming more popular than its vertical cousin, beadboard.
Ron found many options for DIY shiplap on the internet and watched plenty of YouTube videos. While there are many possible ways to get the look, keep in mind that the material chosen affects the final appearance. For example, it's relatively easy and cheap to get sheets of plywood and have them ripped at the lumber yard or home improvement store, However, the wood grain isn't like old wood strips. Plywood would be a good choice if you want a contemporary look, and plan to seal (with BIN) and then paint.
We wanted knots and grain to remain visible through the paint, for that "old, rusticated" feel. And we also wanted a product that already came in narrow lengths. The best choice for us was 8' long v-groove planks that come six to a package from Lowe's. Before getting anything, and especially before cutting anything, you'll want to figure out the square footage you're going to need to cover. Yep, that middle school math really was good for something!
Once you've done your calculations, purchased your wood, construction adhesive, and nails, you'll need to mark a horizontal level line. Grab a measuring tape, large level, and pencil.

Ron measuring out from the kitchen cabinet © Rhiann Wynn-Nolet


In the photos above Ron is measuring for placement of a vertical strip of molding which will serve to separate the planked section from our next big project (a brick wall backsplash in the kitchen).
Here's a photo of the molding in place.

© Rhiann Wynn-Nolet
As it turned out, Ron had to allow for some "adjustments" since the ceiling wasn't completely level. Yep, this happens, even in a new house.
With this particular product you can work from the top down or the bottom up. Working from the bottom up made more sense due to the leveling issue in our situation. You can see our horizontal bottom level line below.
Before putting any boards up, Ron located the studs with a stud-finder and then drew level lines vertically along each one so he'd know where to nail.


Before installing each board, we painted the "tongue" just in case the planks separated a bit over time - we didn't want to see raw new wood. And we also applied a bead of construction adhesive on the back. We went through close to a dozen tubes of that stuff for this project.


Here's the first board below, note the painted tongue.


We wanted the boards to meet up in a staggered pattern so we kept an eye on where seams were falling and cut accordingly.
And there were obstacles to work around, of course...


Ideally we'd have removed all moldings and then replaced them once the planking was installed, but we decided the time involved and risk of damaging said moldings wasn't worth it. So, Ron did some fancy finagling with paper templates and various tools. In the words of Tim Gunn, he "made it work". He also had to use spacers to bring the outlet and switch electric boxes forward to be flush with the shiplapped walls. Here's what those little things look like.


Behold the completed dining room wall. The first of the two walls we planned to do.


And here's the other wall we did--the fireplace wall in the living room.


Then it was time to decide how to paint the walls...
Initially we did a thin coat of off-white, but instead of looking worn and old, it just looked unfinished. So, we painted test patches of a creamier white (looked too yellow against our other greige walls) and a blue-gray color. We went with Sherwin-Williams Lapland Ice, which we found at Lowe's. Since we didn't prime it, the knot holes will eventually bleed through and that's exactly how we want it!


Now for the After pics! Ta-daaaa....

© Rhiann Wynn-Nolet
That banner was for our daughter's high school graduation © Rhiann Wynn-Nolet

All in all, we think the end result looks fantastic! (We're on the hunt for just the right piece of art to put over the buffet).
If you've done the shiplap thing, how did you do it?

Quince Cottage Design Mantra: Create a beautiful, comfortable home that reflects your unique style and personality. 
In our own place, patina is valued, rustic rubs shoulders with opulent (we call this "Agrarian Chic"), and you're sure to get a terrier-style welcome!