Design. Create. Decorate.

Design. Create. Decorate.
Showing posts with label Capitol City Homes. Show all posts

Saturday, August 29, 2015

DIY - Kitchen Cabinet Hardware Part I, Selection

Welcome back to Quince Cottage!
Today we're talking about a design detail that seems small, yet plays an import role in the overall look of your home. In our followup post (aka Part II), we'll be giving you tips for successful installation.
Knobs and pulls come in many sizes, shapes, styles, and materials. The selection can seem overwhelming. We scoured home improvement stores, specialty hardware stores, and the internet, looking for the ones that best suited not only #QuinceCottageStyle but also our budget.
We love the play of sparkle against rustic, so we chose two different knob/pull styles for our kitchen.
Here's the agrarian-industrial pull. The two part construction gives it a really authentic look.

Amerock Pull from coolknobsandpulls(dot)com

Amerock pulls © Rhiann Wynn-Nolet


Amerock pull © Rhiann Wynn-Nolet

And here's the blingy glass knob from knobdeals(dot)com. They are real glass, which DOES make a difference, both in feel and appearance. They were definitely worth the princely sum of $3.95 each!

Glass knobs © Rhiann Wynn-Nolet

Glass knob © Rhiann Wynn-Nolet

We just love this look! It plays really well with our island pendant lights too, don't you think?

Island Pendants © Rhiann Wynn-Nolet

Here's a closer look at those beauties.

Island pendants © Rhiann Wynn-Nolet

And here are two views of our kitchen's off-white cabinetry...

Our kitchen © Rhiann Wynn-Nolet

Our kitchen © Rhiann Wynn-Nolet
And one showing our charcoal gray island...

Our kitchen © Rhiann Wynn-Nolet


Yes, that brick backsplash/wall isn't quite complete, it needs mortaring, but when it's done, we'll blog all about it!

And in case you were missing the doggies, here they are taking a break from supervising the neighborhood...

Daisy and Buster © Rhiann Wynn-Nolet

Thank you for stopping by, we hope you'll come again soon!

Quince Cottage Style mixes old and new, rustic and opulent. 

Our goal is simple - make our new subdivision house look inviting, beautiful,

and as though it wasn't born yesterday.


Monday, May 11, 2015

A Modern Spin on Canopies and Testers

Princesses ALWAYS have canopy beds, and Rhiann desperately wanted one when she was a little girl. Years later, she still craves luxury and style, but with a more practical, modern twist.

We did this bed curtain treatment in our previous house, and it looked good. With the deeper, woodsier wall color in the Quince Cottage master, the result is fabulous!
Thanks, Capitol City Homes for letting us pick whatever color we wanted for our bedroom! FYI, this is Sherwin Williams High Tea.

If you're considering doing bed curtains like these...

Here's what you'll need:
Fabric (to get the necessary fullness we used two 54" wide lengths for the back curtain and stitched them together, and we used three 54" wide lengths for the front curtain). Make sure you buy enough to allow for hems at the bottom and turnovers at the top.
Trim for the bottom of the front curtain, if desired.

We got both fabric and trim in Goldsboro, NC at The Cloth Barn which has TONS of fabric and gorgeous trims at discount prices. 
Two curtain rods. We had to order the one with longer side pieces online, but it was very reasonably priced. Graber makes these and you want one that extends about 3-4".


Studfinder
Screws and wall anchors (because if you're not lucky enough to hit studs, you'll need anchors)


Starter nail
Hammer
Screwdriver
Screw hook
Tape Measure
Level (you'll need this only if you're not hanging at ceiling or crown molding level)
Ladder
Dogs. Well, you don't actually NEED them, but just try doing any project without them... Terriers make everything more fun, right?

Buster & Daisy © Rhiann Wynn-Nolet

How To:
Careful measuring is key to successful installation. Fortunately, Ron's a Virgo, so he's a natural when it comes to precision. For our particular space, we needed the middle of the rods to line up with the chandelier. The tray ceiling made this a bit more challenging, but we measured the wall opposite the bed, then measured the same length on the bed wall and marked the center of that.
Next we measured the width of the bed. Because we wanted the curtains to show slightly beyond the edges of the headboard, we added two inches to each side when we measured out from the middle to where the first rod bracket would be installed.
Hopefully that makes sense. Writing this reminds me of a grade school assignment titled "Instructions For Tying Shoelaces".
Ron installed the rod for the back curtain first, using wall anchors to make sure the weight of the fabric would be fully supported. It's easier to use wall anchors if you use a nail to make a starter hole and widen it a bit by wiggling the nail around.


Next he put a screw-in hook in the center for even more support, so the curtain wouldn't sag.


(Yes, dark paint does scuff easily. In this case those marks will be hidden by the curtains, so no biggie).
Then he hung the first curtain, and installed the second rod's brackets about 2" out on either side.


Done! Doesn't it look great?

Bedroom © Rhiann Wynn-Nolet


Bed Curtains © Rhiann Wynn-Nolet
Unfortunately the bedding colors are a bit off in these photos. The sheets are Ralph (found at HomeGoods) and have little cream-colored polka dots, and the quilt isn't nearly as sage-y, it's more of a willow or spring green. Here's a closeup, at least you can see the dots, and the quilt color is better, but not 100% accurate. Sigh.


Here's a macro of the ball trim. Adorable, isn't it?


Daisy found this whole project boring and dozed off in the middle of everything.


At Quince Cottage we like to get a lot of "look" without spending a lot of money. We both love fern motifs and this fabric was the key to everything else in the room in terms of color. Lying in bed, it's easy to imagine we're in a cool forest glade (minus the bugs and snakes).

Thank you for visiting! We hope you'll stop by Quince Cottage again soon. Future topics include: what to do when your curtains are too short, a special door for our office, and a recipe for pineapple rice.

Sunday, March 29, 2015

Counting Down!

In a little over a week, we'll be moving to Quince Cottage! We're trying to focus on the excitement, not all the things we have to accomplish prior to move date.

We have a mailbox!

We're official! © Rhiann Wynn-Nolet
The shutters are on and painted. We'll install shutter dogs later. Capitol City Homes built a fine looking house, don't you think?

March 27 © Rhiann Wynn-Nolet

Lighting has been installed, the hardwood and carpet are in, as are plumbing fixtures and some of the appliances. Here's a peek at our back hall heading to the laundry, and up to our younger daughter's bedroom/bathroom (floors are covered with paper).

Back Hall & Stairs © Rhiann Wynn-Nolet

The fence is almost done...

Fencing almost done! © Rhiann Wynn-Nolet

Buster and Daisy sure are going to have a ball in their "free range" backyard! They love exploring. Here they are on a trail in Maine.

Jacks, exploring © Rhiann Wynn-Nolet

Quince Cottage Design Mantra: Create a beautiful, comfortable home that reflects your unique style and personality. 
In our own place, patina is appreciated, rustic rubs shoulders with opulent, and you're sure to get a terrier-style welcome!

Wednesday, March 18, 2015

Green For St. Patrick's Day!

Okay, so we're a day late in posting, but you know, life...
While we didn't actually wear any green yesterday, suddenly, dramatically, thanks to the hard-working Capitol City Homes landscaping crew, the orange clay surrounding Quince Cottage was transformed into a beautiful, glossy green worthy of Ireland herself! Holy transformation, Batman!

BEFORE

Early March @Rhiann Wynn-Nolet

AFTER

Wearin' O' The Green © Rhiann Wynn-Nolet
Remaining shutters still need to go up. The front door and the existing shutters were being painted when we drove by this afternoon.

You might notice a few other changes...
1. Siding is finished
2. Porch posts and steps are in
3. Driveway and walkway are complete

Bet you're wondering what's happening inside, huh? We'll show you more soon, but here's a photo to tide you over.

Front entry © Rhiann Wynn=Nolet
The actual wall color is somewhere between the two seen in the photo...

We're scheduled to close April 2nd. Woo boy, it's exciting!

Quince Cottage Design Mantra: Create a beautiful, comfortable home that reflects your unique style and personality. In our own place, patina is appreciated, rustic rubs shoulders with opulent, and you're sure to get a terrier-style welcome!

Here are Daisy & Buster, keeping watch for intruders, and visitors, and squirrels.

Was that a squirrel? © Rhiann Wynn-Nolet

Sunday, March 8, 2015

Choosing Exterior Colors

Making design choices is both fun and torture. 50SOG as it applies to house-building?

There are a two Parade of Homes events in the Raleigh area each year. They are a blast for "homees" like us. Get it? Foodees/ies, homees, homies? Anyway, one area builder caught our eye because they often do white/cream/barely-there pastel palettes. Amid the sea of earth-tones and grays around here, those houses always stand out.
Here's one of their homes, and it served in many ways as our inspiration house. The color in the picture below is not accurate for the shutters, those were a more of a putty color.

Parade of Homes © Rhiann Wynn-Nolet

So, when it came time to pick the siding and trim colors for Quince Cottage, we were torn between two options. One we knew would look good (dark gray body, white trim, "color tbd" for shutters and door) OR what we'd fallen in love with during the home tours. Choice A was safe, and reminded us of New England, our motherland, so to speak. Choice B was riskier (would it look washed out, bland, too yellow, too beige?), but also more Southern, which was what we really wanted.

© Rhiann Wynn-Nolet
In case you're curious, the siding color is Classic Sand with White Birch trim, and the shutters and doors will be Sherwin Williams Dutch Tile Blue (shown below).


While attempting to make up our collective mind, we talked about it endlessly, and we played with some online design tools. The problem is that online sample homes aren't exactly like the one we were building, and in the case of this one, there was no option for shutters. This made us scratch our heads, but anyway, here's an example of what we created to get an inkling of how our color scheme might look.


Homeplay.com Design 

Between the disgusting weather we had in February and missing windows that had to be installed before siding could begin, nothing much happened on the outside of our house after it got wrapped.
Last time we showed you Quince Cottage, this is what it looked like.

© Rhiann Wynn-Nolet

BUT this past week it underwent a MAJOR transformation and here's what it looked like yesterday! The first two shots were taken in the morning, after we walked Buster and Daisy.

Gratuitous Cute Doggie Pic © Rhiann Wynn-Nolet

Ta-daaaaa...

© Rhiann Wynn-Nolet
© Rhiann Wynn-Nolet

© Rhiann Wynn-Nolet

Then we went back in the afternoon and look! Shutters! They're only primed, but since Dutch Tile Blue isn't far off from this color, we have a really good idea of how Quince Cottage will ultimately look.

© Rhiann Wynn-Nolet
We're SO pleased! It looks soft and pretty and has a nice Southern vibe. Our last three homes have been Craftsman style and though we love that look a lot, we wanted to mix things up with this house. While there are still Craftsman elements, this light palette is really fresh. Nothing drab about it!
Shout out to Capitol City Homes for letting clients customize with door/shutter color, choices of clapboard, shingle and board & batten and having a great crew hard at work on our house!

We'd love to hear about your home's exterior color scheme. How did you choose the colors? If you had no choice, what would you have done differently?


Quince Cottage believes a standard subdivision house can be transformed into a beautiful home that reflects the unique taste and personality of its owner. In our own place, rustic and opulent rub shoulders. Think gilded mirror against a ship-lap wall. 


Sunday, March 1, 2015

Let There Be Lights, Lots Of Lights!

At Quince Cottage we believe the right lighting can do for a living space what the perfect piece of jewelry can do for an outfit. One of the first things we did when decorating our current house was to replace the builder fixtures. Now that we're about to put that house on the market, poor Mr. Quince Cottage, aka Ron is busy uninstalling the ones we bought and re-installing the originals. There may have been a moment or two of regret about the sheer number of crystals that had to be detached, and will have to be reattached. Bling comes at a price (aching neck, bleary eyes, and sore fingers).

Anyway, back to the topic of replacing standard lighting. We scoured the interwebs and local stores for fabulous (discounted) pieces, because the only thing better than a beautiful decorative accent is one you scored at an amazing price, right?

Capitol City Homes, the team who's building our new home, had some great basics to offer us, and we're taking full advantage. Fortunately they're also willing to install lights we bring to the party!

We thought it would be fun to share those with you...

This one was from Gallery74 ($99). It was in my office, but will be adorning our younger daughter's bedroom.

Gallery74

And here's another one from Gallery74, this time for our older daughter's bedroom. Be sure to check Gallery74's $99 and under page for beautiful fixtures. Having ordered them, we can also say they are good quality as well as affordable.

Gallery74
We found this one on clearance at Lowe's for $69! We added the twine around the center post and the candle arms to enhance the "Nature" theme it already had going for it with those green beads. It will continue to work as the master bedroom overhead light.

Master Bedroom © Rhiann Wynn-Nolet

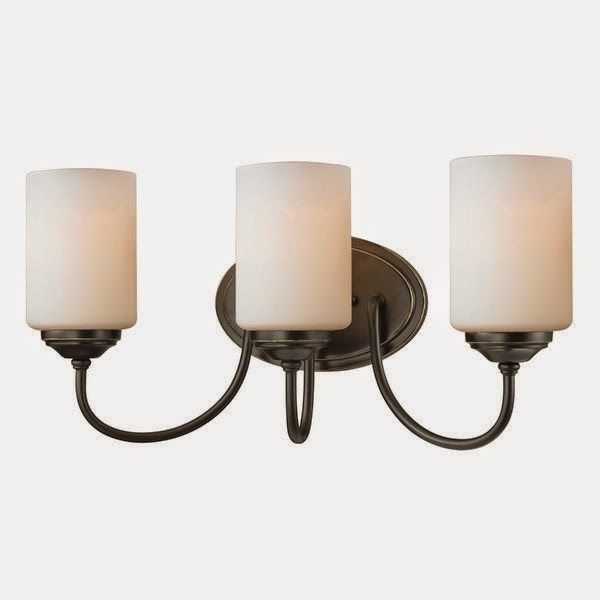
At Overstock.com we purchased this fixture (times 2) for the master vanity. We liked the graceful, clean lines and pillar shades.

Z-Lite Cardinal from Overstock.com 

Here's another steal from Lowe's clearance. Won't it be lovely in the entry? It's a good "intro" to our mash-up style of rustic/agri-industrial with sparkly.

Lowe's Deal © Rhiann Wynn-Nolet
We'll have two of these in hallways that lead out from the main entry. Again, Lowe's clearance finds, for under $25 each. Check those endcaps in the lighting department!

Schoolhouse Light © Rhiann Wynn-Nolet

In our current house this illuminates our breakfast area, but in the new home it will be in our office. It's a slightly more modern interpretation of our design aesthetic. We got this beauty online at LampsPlus.com  At the time it was on sale for about $100.

Office © Rhiann Wynn-Nolet
This one's currently hanging over our dining room table, and it will grace our new dining area too. $199 at LampsPlus.com. The simple, spare silvery-bronze framework along with the crystal beads were exactly what we were looking for.

Dining Room © Rhiann Wynn-Nolet

For $89 each, these pendants from Home Decorator's will add a little opulence over our kitchen island. They don't even have to be hard-wired, they're available with an adapter for can lights. How cool is that?

Home Decorator's
This Kathy Ireland piece will go in our living room - it's way prettier in person (but currently still in pieces in a box, awaiting installation). Can you believe we found this impressive fixture for $180?

Kathy Ireland Chandelier - sorry about the grainy photo, had to take it from the LampsPlus website

At the moment our bonus room looks like a lighting store warehouse! In an upcoming post we'll show you these pieces in their new home, as well as the builder fixtures we chose.

Lighting provides excellent opportunities to showcase your style, and it doesn't have to brake the bank!